Wednesday, 27 December 2017

Weekly Blog for Bumbleberry Getting more from your stamps, Reverse technique.


Thank you for popping over, I do hope you had a fantastic Christmas, Ours was a very stress free relaxed affair.
Just our daughters and my gorgeous, Grandson (Leland) at the main event \Christmas day. Followed by a buffet on Boxing Day were our Sons and their Girlfriends, joined us.
I cant believe how my 4 children are all adults my youngest being 16 next month. It only seems like yesterday we was leaving out milk and cookies for Santa. 
Oh well enough reminiscing, and get on with the reason of this blog.
Reverse stamping what is it?


Its when you take an image and reverse the way it faces.
So here the image on the left is the original image from Bearly Happy Holidays. https://www.bumbleberrys.co.uk/products/beary-happy-holidays?variant=47479870794
Then its been reversed to look like their dancing together, I then added her clothes and laces to their boots using a fine liner.

How do you do it?
The answer is there is two ways.
One is using a light box, and the other is using a large clear stamp.
I have used both and I say that there is not one I prefer. Maybe the clear stamp, is quicker and less chance of getting it wrong.


Clear stamp by MFT called Mirror Image,


Place it in your stamping tool and stamp image on to it, then close the lid. 


Then The image is reversed.


With the second technique you stamp your image on a piece of copy paper, turn it over and place it on a light box.

Then place your card stock over the image and trace the image. I do it in pencil then use a memento pen after, so I can use my alcohol markers.

I hope you will give this ago as you can double the images you have.
 Stretching your stash! 
God Bless and Happy New Year!
Jo
xxx


Monday, 18 December 2017

Weekly Blog For Bumbleberrys using Lawn Fawn Stamps Bearly Happy Holidays, To create a spinner card.


Well Hello Again Crafty Friends,
This week I have had the pleasure of playing with the Lawn Fawn,Bearly Happy Holidays,https://www.bumbleberrys.co.uk/products/beary-happy-holidays 
This cute little skating bear is simple adorable and great for an interactive card.


Step One


Stamp and colour the front and back of skating bear.
Then I chose a piece of backing paper, from the Lawn fawn, Perfectly Plaid (Winter) Pad.

Step Two


Temporary attach the backing paper to the card blank, then die cut a window in the front flap using MFT Stitched Rectangle Peek A Boo, or a shape in which the bear can rotate in.


Step Three

Attach a piece of clear beading thread, or something similar.
to the top and bottom of the window.


Step Four
Attach the bear, front and back. in between the tread. then add the backing paper, lastly add the sentiment stamped in Lawn Fawns ( mermaid ink)  and jewels. I used shimmering pool mix from Little things from Lucy Things.
Inside i stamp out the show flakes behind the window in a lighter ink (MFT Snow cone).
Twist the Bear round and round so when its opened he spins.
This will add some magic, to your card as he looks like hes skating.

Wishing you all a
 Very Merry Christmas
and A Happy New Year,
God Bless
Jo
xxx


Tuesday, 12 December 2017

Weekly blog for Bumbleberrys Using.... Mama Elephant-So Many Snowmen, Zig Clean Color Markers

Well Hi There Crafty Friends,
Christmas is speeding towards us, its time to present buy, finish the cards and any other crafty projects we been working on.
I could not believe, my luck. when my DT stamps arrived. Mama Elephant is defiantly, one of my favourite companies. So Many Snowmen https://www.bumbleberrys.co.uk/collections/new-releases/products/so-many-snowmen is such a cute stamp which can be used a a main focal point on a card or as a repeated background. 

So with out delay, I raced to my craft room with ideas, popping into my head. 
I couldn't  wait to start playing with this cute set,
deciding to use Bristol Water Colour Card, and Zig Clean Color real brush markers.
This is what I came up with.


Step One

Firstly Stamp using Versafine Onyx Black ink pad. Then Stamp the image again out, on masking paper.


Step Two

Cover the image in the mask. Then using MFT Drifts and Hills stencil, Distress Oxide in Salty Ocean and a brush or blending tool create the sky and snowy hill.

.

Step Three

While the mask is in place, add a little blending to the top of the mask.then splatter some white acrylic paint. This gives the look of snow.
When dry remove the mask. 


Step Four

Then with a light blue Zig Marker, start filling in any background behind the snowmen.


Step Five

With the same blue start colouring all the snowmen face and body, but using a water brush to blend the colour.


Step Six
Colour the rest of the snowmen and add sentiment, I used another Mama Elephant Stamp set called Merry Christmas Wishes.
Backed on to some green plaid paper and then added to a C6 card blank. Last thing was use a sparkle pen to snowmen and white flower soft added to hill and top row of snowmen, to give the look of snow. 


Hope you enjoyed this weeks blog, be sure to comment.
God Bless
Jo
xxx


Tuesday, 5 December 2017

Weekly Blog for Bumbleberrys, Quick Thanks Card using MFT Die namics and Distress Oxides.

      
Hi There Crafty Friends,
Hope your all keeping warm in this cold, I decided to warm up the craft room this week, with some lovely hot colours using my Distress Oxides in Fossilised Amber, Picked Raspberry and Candied Apple. To Make a Thanks card using the fantastic Thanks Die from MFT.https://www.bumbleberrys.co.uk/products/die-namics-big-thanks 


This big thanks die is a great size for making a real statement, on your card.


First I created the background by blending the distress oxides and a few drops of water.


 Then I die cut into it, removed the letters. These can be used on another card later. 2 for 1.


I took a thin slither from the background before mounting it on to a card blank.
I then glued the thin slither on to the front, I turned it round to create interest to the design and added Nuvo Drops in coordinating colours.


A very quick and easy card. 
Great design  to create mass cards with ,maybe  to say thanks for all those lovely Christmas Pressies Santa's bringing soon.
I hope you've enjoyed this blog and please leave a comment as Id love to hear from you.
God Bless
Jo 
xxx 

Tuesday, 28 November 2017

Bumbleberrys Weekly Blog using Avery Elle Stamps...... Cool Beans and Prisma Pencils

Hi There crafty Friends,
Hope your keeping warm, I've been warming myself up playing with this cute little stamp set from Avery Elle, Cool Beans https://www.bumbleberrys.co.uk/collections/avery-elle/products/cool-beans-clear-stamps and Wonky Squares https://www.bumbleberrys.co.uk/collections/avery-elle/products/die-wonky-squares-elle-ments I am a big coffee fan especially  Latte's. I had to get these stamps.


A very quick and easy card, stamped and coloured using Prisma colour pencils. High lights in white gell pen. Di -cut out with wonky square.

God Bless
Jo
xxx

Tuesday, 21 November 2017

Wednesdays Blog For Bumbleberrys Using The Latest Release from Heffy Doodle

Hi There Crafty Friends,
I am so in love with Heffy Doodle Stamps that I couldn't resist playing with the latest release. The Amazing Eskimo Kisses / Warm Hugs stamp set just melts me! (pardon the pun)! https://www.bumbleberrys.co.uk/products/warm-hugs-stamps


This Cute 6 x 6 card was created by using the new MFT Drifts , Hills stencil and Peacock Feathers Oxide Ink to create the background. Memento grey ink was used to stamp the snow flakes. Also I stamped out the igloo in the same grey ink. In black Memento ink, I stamped out the little girl and boy. Then, I coloured them in alcohol markers. Next , I made the scene up and placed it on to a card blank which had been layered in Lawn Fawn Winter Plaid Paper. 
Finally , I finished off with a  few of the sentiments and Nuvo drops in clear and sea breeze.


I think you'll agree these images are so unique.


God Bless
and
Crafty Hugs
Jo
xxx

Tuesday, 14 November 2017

Wednesday Blog for Bumbleberrys using MFT Dashing Deer for a non Christmas Card.

Hi There My Crafty Friends,
I hope your all well, and keeping warm. I am in a lot of pain at the moment with Sciatica which has been on and off for a year. But nothing stops me creating. My true love of rubber stamping, keeps me sane. So I was thinking this week not all our friends and neighbours celebrate Christmas. So what can we send  them to wish them all the best for the season with out being to Christmas Themed. I think using the rabbits and the sentiments from the dashing deer from MFT,  https://www.bumbleberrys.co.uk/products/dashing-deer work well teamed up with a distress oxide background. Plus you have lots of other possibles for your Christmas cards as I have shown previously. This is a  truly versatile stamp set.
I used Bristol Strathmore card stock and blended a few colours of Distress Oxides, then splash some water droplets and white acrylic paint. On the same card stock I stamped out three bunny's and coloured them in real zig markers. Fished off with a white gell pen and some drops of Ranger Enamel Accents.
Thank you for visit my blog,
Take care and God Bless
Jo

Tuesday, 7 November 2017

Wednesday Blog using MFT's Dashing Deer.

Hi There Crafty Friends,
Hope your all staying warm and cosy in this seasonal chill. I am starting to get into the Christmas mood, theme of card making. Now were into November and there's only 6 weeks to go. So this week I have made a card, which is easy to follow. Using the Dashing Deer Stamps https://www.bumbleberrys.co.uk/products/dashing-deer 
I used Neenah card stock, and stamped round the edges. Using the floral and bird stamps. Then built up the scene, using the deer and rabbit stamps. Then coloured in using alcohol markers. Adding a little tumbled glass distress ink, and  a little glitter to add to the effect of making  snow drifts. Finished off by using sentiment and backing paper.
Final thing added grey twine to side of card.
A very easy and quick card to produce.

Take Care
God Bless
Jo
xxx 

Tuesday, 31 October 2017

Wednesday Blog for Bumbleberry using Heffy Doodle stamps, Ad-Roar-Able Lions 3 Different Cards.

Hi There Crafty friends,
I haven't stopped playing with these stamps https://www.bumbleberrys.co.uk/collections/stamps/products/ad-roar-able-lions, their whimsical designs are so versatile that ideas, were popping in to my head. So instead of a step by step this week. I thought i just show you all the cards I've made this week using these fantastic stamps.

Card One
Masking Tecniques

Card Two
Random Stamped Backgrounds


Card Three
Interactive + Background

God Bless
Jo
xxx

Tuesday, 24 October 2017

Wednesday Blog for Bumbleberrys using The New Release From Heffy Doodle Stamps, Ad-roar-able Lions.

Hello There Crafty friends,
I hope your enjoying half term at the moment, and you've managed to get some crafty time to your self. I have the week off my other job, so I'm making the most of not having to go into work, and extra time in my craft room. 
This week I have had the exciting task of playing with a new stamp company, to Bumbleberrys. Heffy Doddle which was only formed in 2017 in the USA, by Lesley Oman.
 Her Whimsical designs are so cute and quirky, I have adored playing with the Ad-roar-able Lions. https://www.bumbleberrys.co.uk/search?q=ad-roar-able+lions I teamed it up with the MFT radiating ray stencil https://www.bumbleberrys.co.uk/products/stencil-radiating-rays


Firstly I stamped the Lions on Neehah Card stock, with Memento Ink, and then coloured them in alcohol inks. Then I die cut out the largest lion. 
To create the background I used the MFT stencil and using oxide inks in three shades, I blending them from lightest to darkest from the inside to the outer edge f the stencil.


Then I stamped the sentiment in black,mounted it on to black card stock then put it onto a card blank.


Mounted the Lion with some foam tape to raise him, to create dimension.Then added a few more sentiments to build up the design.


I do hope you check out some of the new stamps, at Bumbleberrys from Heffy Doodle, as the are so unique and fun.
I will be back next week with a blog, using these delightful stamps. 
God Bless
Jo
xxx

Tuesday, 17 October 2017

Wednesday Blog using MFT Stamps from the new release and Prisma pencils on Kraft card.

Hi there, Crafty Friends,
This weeks blog takes a look at the latest release from MFT, Dashing Deer.


Cute little Deer images, Bunny and Birdies, Foliage and Sentiments.
 I used my Prisma coloured pencils on kraft card.They show up perfectly,without need for you to put down a white base. 
You can also use spectrum noir pencils (colour blend). But price and quality in my opinion, Prisma are beyond fantastic on both counts and used by any famous crafting gurus. 


Firstly I coloured the images with Prisma pencils then die cut the frame.
Then stamp the sentiment under the image. Using a white pencil I blended around it, to create the look of snow.
Then on a separate piece of kraft I stamp another sentiment. 
Finally I add Nuvo drops in white to create the look of falling snow.
Then mounted it on to a white card blank.
Next week I will be using some new stamps to the range we sell at Bumbleberrys.
Heffy Doodle.

God bless
Jo
xxx
  

Tuesday, 10 October 2017

Wednesday blog for bumbleberrys using MFT Wild Woodland and The Retiform Stamping Technique.

Hi There Crafty Friends,
Well after some major tec problems, I finally managed to download the images used in this blog. I promised to show case this technique, and I was going to make sure I did. I saw the Retiform technique a few years back and have love it ever since, what is it, I hear you ask, well I am going to show you step by step. Using MFT stamps Wild Woodland.https://www.bumbleberrys.co.uk/products/wild-woodland


Step one
Take a card blank and a folded piece of copy paper or card.


Step two
Using an blending tool ink sections on to the card blank.Using the piece of copy paper.


Step Three
 Then using a lighter colour blend in blank white areas.


Step Four

Then masking over each section, post it notes are fantastic and cheap.Stamp each set of stamps you want in your design.

Step Five


Step Six

Move on to each area making sure you covered that section up to the blended line.


Step Seven
Fill each area until it is completed. I think your agree it gives a total different look.Mine is chalky looking as I used Distress Oxides but any ink pad will do.


I hope you enjoyed seeing this technique explained, if there is anything you like me to show please leave a comment i'm only to happy to oblige
Next week I'll be using Prisma pencils and Kraft card. 
God Bless 
Jo
xxx

Tuesday, 3 October 2017

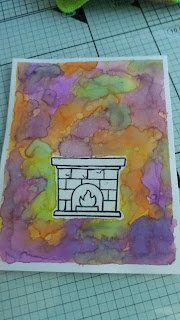
Another Look At Lawn Fawn's Christmas Dreams Stamps, are they just for Christmas.............

Morning Crafty Friends,
I am always looking for ways to get more out of my stash, and this weeks blog has that exact content. Taking another look at Lawn Fawns Christmas Dreams, is it just for Christmas.  https://www.bumbleberrys.co.uk/collections/new-releases/products/christmas-dreams
I decided to change the Christmas look of the firer, and to come up with a Halloween Theme Card, getting another take with the same stamp.


I felt the Flames in the firer looked like a ghost.

So I stamped the image of the firer place, on Bristol Smooth card stock. Then using masking fluid to cover it up, then using Distress oxides. I began to make a water colour background. Wetting the card stock first then using a paint brush added in drops of ink.


 Once it was all dry I rubbed away the masking fluid, Then I drew in some cracks, spell books, and spiders webs. Using my Alcohol Markers I then added Colour, also I used the clock and the candle stick from the same set. A bat stamp, a Sentiment stamp from another set I have in my stash.


Using matching card stock I mat and layered the image on to a card blank, then finally added glossy accents and Nuvo drops to finish the look.


After this I looked at the stamp set again and thought the oval rug would make a fantastic stitched petal, so off I went again making a template with a ruler and pencil working out where each petal would go.


I stamp each oval rug opposite to each other. Then Scan and cut out the image.
Did some petal curling with an embossing tool, after it had been coloured using my alcohol markers.


A simple sentiment and we have a totally different card for any occasion. So just because they say a season or occasion, look how you can adapt your stamps, and come up with some thing totally different.
I do hope you enjoyed this blog, please comment as I love to read or your comments.
Also I am only to happy to cover a technique if you would like to see step by steps on a certain look.
Next week I am covering a totally new technique to me, But with out giving to much away, I'm totally hook on this masking technique.

God Bless
Jo
xxx


Followers