Wednesday 31 March 2021

Are You Like Me, Struggling With Water Colouring Your Images. I found a much easier way! Using the latest Release from Colorado Craft Company.

Good Morning, or Afternoon depending on when your reading this,

Well Easter is finally here and Spring has sprung! 

I hope you're all keeping well. I have really struggled with water colouring over the years, I recently was watching a video by Cathy Zielske. She explained she also struggles but had been told that distress inkpad's give you and easier way to achieve the look. So I thought lets give this a go.

Here Is the Result.


Products

Bunnies and Robin Stamp Set (Colorado Craft Company)

https://www.bumbleberrys.co.uk/collections/colorado-craft-company/products/anita-jeram-3-bunnies-robin

Obsidian Ink  Black  (Altenew) Or Versafine Onyx Black

https://www.bumbleberrys.co.uk/collections/altenew/products/obsidian-pigment-ink

Distress Ink Pads (Ranger)

Water Colouring Brushes (Altenew)

https://www.bumbleberrys.co.uk/collections/altenew/products/artists-watercolor-brushes-detailed

Bristol Smooth Water Paper ( Strathmore)

Black  Liquorice Card Sock (Lawn Fawn)

https://www.bumbleberrys.co.uk/collections/lawn-fawn/products/black-licorice-cardstock?variant=1535461359626

C6 Card Blank


Method


Stamp a clean and clear image with a water colour friendly ink


To make your pallet I stamped my ink cubes down on my glass mat.


Then I wet my paint brush, picked up a little colour and added to my image. I carried on until I had completely water coloured the image.


I then trimmed the image, stamped the sentiment "Hello Spring" on the left of the image.


                     I mounted this to a piece of black cardstock trimmed a small border using my guillotine 


I have been inspired to try more water colouring in this way. truly I found it so much easier as you don't have to worry about adding  more or enough water.

These Images have captured my heart, they are by the famous illustrator Anita Jeram.

Happy Stamping and Happy Easter

Jo
xxx


Wednesday 24 March 2021

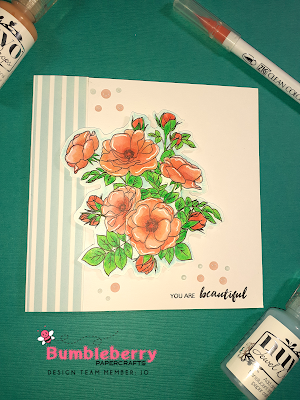
Water Colouring With Zig Markers Using Paint -A Flower ( Anemone)

Hello There and Welcome 

To this week's Wednesday blogpost 

I'm really loving water colouring at the moment, I seem to go through stages with my medium's. I think most of us work like this.

The Paint - A - Flower,  range from Altenew, is currently being used on their blog hops, as it has just had a new released. I am using a later stamp from this range.

Just the ticket to get out the Zig Markers and the Bristol Smooth Cardstock. You can use any water colouring paper and pens, paints etc..... this is just what I used.

Products

Paint - A - Flower  Anemone (Altenew)

https://www.bumbleberrys.co.uk/collections/altenew/products/paint-a-flower-anemone

A Love For Strips Set A Paper Pad (Altenew)

https://www.bumbleberrys.co.uk/collections/altenew/products/a-love-for-stripes-set-a-6x6-paper-pack

Bristol Smooth Water Colouring Cardstock

 Brush Markers (Zig Clean Color Real Brush)

Jewel Drops in Orange Marmalade and Sea Breeze (Nuvo )

Versafine Ink (Onyx Black)

White Jelly Roll 10 (Sakura)

6 x 6 " Card Blank


Method

Stamp Anemone image in waterproof ink on to water colouring card stock.

Then colour this using your real brush markers adding the colour straight from the pen, then water on a paint brush to lighten the colour towards the ends.
Add deeper colour to the middle of your flower.


Once dry add white high lights with your jelly roll pen.
I then gentle went round the image with a  very light blue blush marker
I then fussy cut it out, there are dies but I didn't have them.
I then took a 6" x 6" card base and stamped my greeting in versafine ink as it a crisp ink.

I added a strip of pattern paper, to use at the side of the card.


Attached to the card blank using 3D foam tape and added my drops.
I hope you enjoyed this blog post, please let us know if you would like to see more.
Happy Stamping
Jo
xxx


Wednesday 17 March 2021

Sometimes a whole 6" x 6" card base can be over whelming , so why not scale down your card.

Hi There, Crafty Friends,

 Apologies for my absence  last week, we had a slight family emergency with my daughter. But she is on the road to recovery now so I'm back today. 

Sometimes its dauting to decide now to fill your card, with a design. So if this is the case I tend to sc ale things down.

Let Me Show You!


I fell in love with this little fox image from My Favorite Things.


Products

My Favorite Things Lets Curl Up Stamps

https://www.bumbleberrys.co.uk/collections/my-favorite-things/products/lets-curl-up

 Gina K Wreath Builder Template 3 3/4 

https://www.bumbleberrys.co.uk/collections/gina-k-designs/products/wreath-builder-template?variant=12866604826706 

Kraft Card 4 x 4"

Water Colouring Paper 3 3/4 x 3 3/4

Honey Bee Stamps Gems in Raw Honey

https://www.bumbleberrys.co.uk/collections/honey-bee-stamps/products/raw-honey-gem-stickers-300-count

Zig Real Colour Brush Markers

Wreath - 046 Mid Green, 043 Olive Green

Back Ground 050 Yellow, 075 Brick Beige

Wheat  (Concord and 9th) for Grasses.

Black Soot and Walnut Stain Oxide Ink Pads By Ranger

Versafine Onyx Inkpad

Masking Paper

5 x 5 " Card Blank


Method

Using a Misti, I lined up the Water Colouring cardstock in the  wreath builder.


I then choose a foliage image from the stamps. I turned the wreath builder as instructions. Using Versafine Onyx ink.

I then Stamped the fox image in the centre.

Once this was dry, I stamped a mask to sit over the fox. 

Then using water and zigs markers I created a was over my work.

Once dry I coloured in the foliage wreath.


 I removed the masking paper over the fox, and continued to water colour him using the Zig's.

Added a base (Ground)

I then replaced the mask and stamped over the top with some more grasses.

Added some splats, and then when dry removed the mask.


Before mounting this on to a card blank.
I added a layer of Kraft Card Stock. and stamped tiny hearts on to the card base. 


Finally I added a few gems in raw honey to give a little something.


Thank You for poping bye

Happy Stamping

Jo

xxx


Wednesday 3 March 2021

You make the world a better place! Using Concord and 9th Products.

 Well Hello, I hope your all well,

Todays blog enjoys a firm favourite of mine, embossing!

This was the one product that drew me into card making all those years ago.

It never gets old.


Products

Globe Greeting Stamp Set - Concord and 9th

Sea Glass Cardstock - Concord and 9th

Sea Glass, Dove, and Ballet Slipper Ink Pads - Concord and 9th

Copper Embossing Powder - WOW
Embossing Inkpad - WOW

Copper Envelope Gina K

C6 Card Blank

Method

Firstly I stamp the globes stand in embossing ink, and embossed it in Copper embossing powder. I then lined up the globe with the stand in my Misti. I then inked up the stamp in Ballet, I stamped it twice.


Then after I made sure it was dry, and no embossing powder would stick.

I lined up my sentiments on the globe its self and stamped in embossing inkpad and embossed in copper powder.
Once I'd reach this point, I stamped the little heart image in the three inkpad colours, Sea Glass, Ballet Slippers, and Dove.
I then trimmed my panel to leave a slight border around and matted it on to Sea Glass cardstock to tie it all together.
I unfortunately lost so of the pictures to this blog post. 

Personal Update

Its been a extremely busy time in the Summers Household. With the arrival of my third grandchild, and my mother then my father taken ill. 
So please excuse my lack of step by step information. 
But I never like to miss my blog day.
 
Happy Stamping
Jo
xxx

Followers