Wednesday 25 August 2021

No Coloured Cardstock, No Problem Using Honey Bee's Bicycle Builder Honey Cuts

 Welcome Crafty Friends,

Today blog features the Build A Bike, Honey Cuts From Honey Bee Stamps.

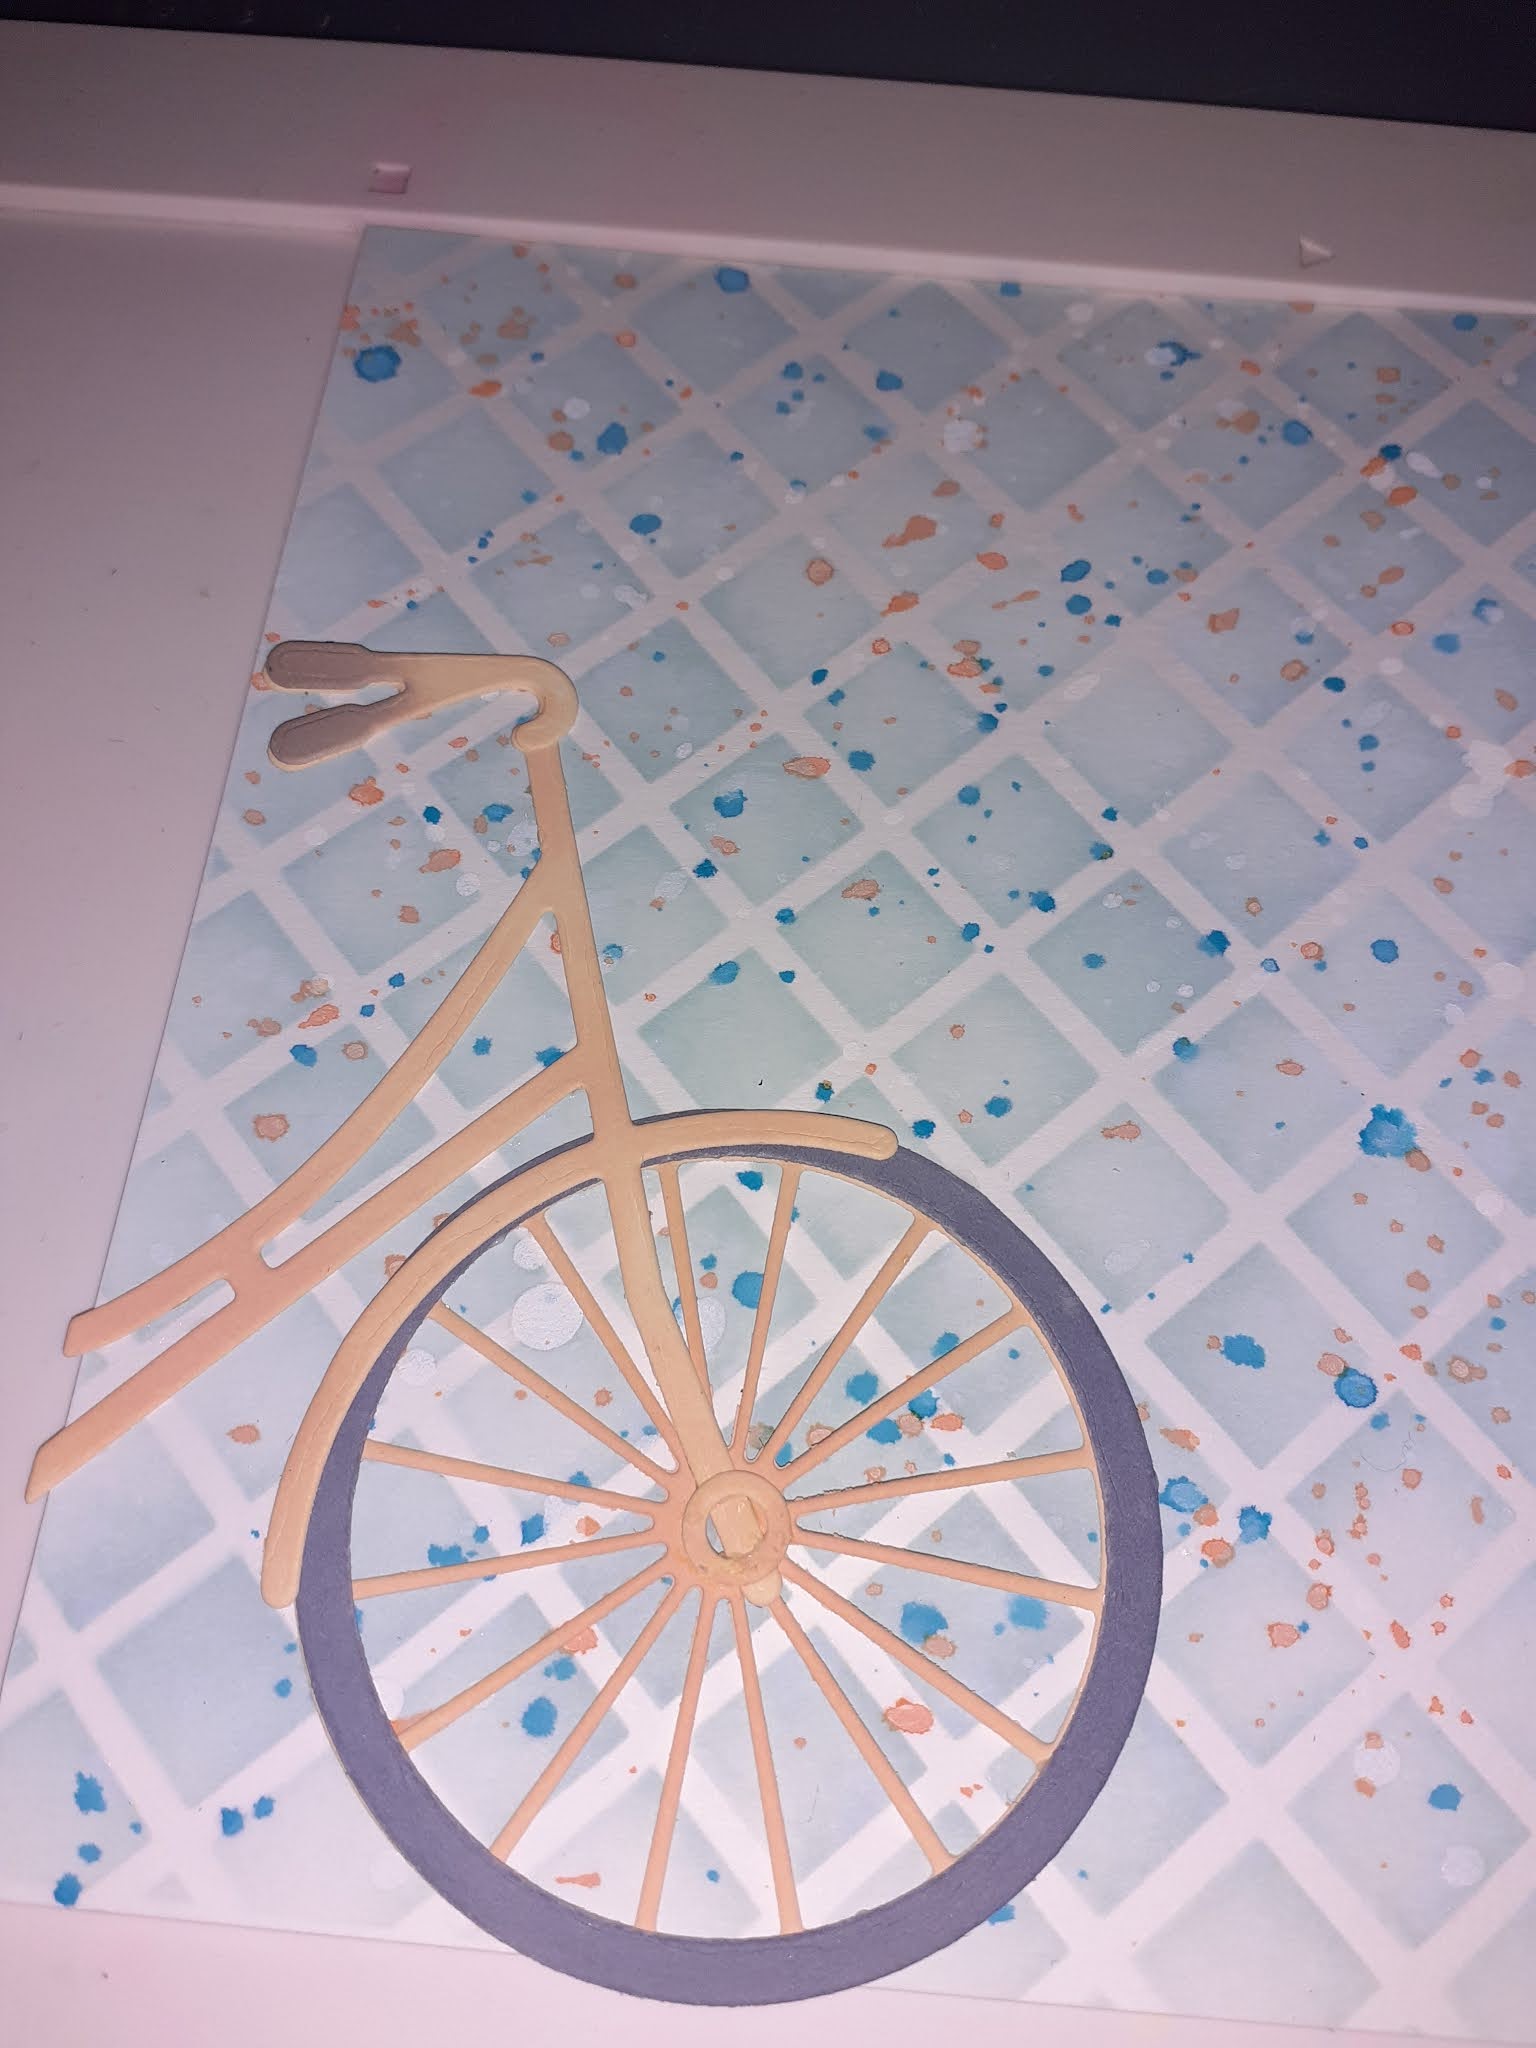
Not everyone has a stash of  different coloured cardstock, so today I show you how to use your white cardstock and inks to achieve the same look. In this instance I used Oxides but Die, Pigment or Archival would also be fine.


Products
Bicycle Builder Honey Cuts ( Honey Bee Stamps)

Enjoy  Stamp Set ( Honey Bee Stamps)

 
Trellis Stencil (Altenew)

110lb Cardstock ( Neenah)

Inkpads
Distress Oxides In, Dried Marigold, Speckled Egg, Antique Linen, Brushed Corduroy, and Hickory Smoke. (Ranger)

Sprays
Distress Oxides Sprays in Spiced Marmalade and Mermaid Lagoon ( Ranger)

Crystal Glaze (Nuvo)
Sparkle Pen ( Spectrum Noir)
White Jelly Roll Pen ( Sakura)

Method

Cut a piece of Neenah cardstock down to 5 1/2"
Using the trellis stencil and a blending tool blend on Speckled Egg Oxide Ink.

Then using your sprays, splatter your stencilled background in both colours. I remove the nozzle from the bottle and splash the ink from the straw part of the applicator.
Die cut your bicycle parts all of them out of your 110lb cardstock.


Then using your ink pads add colour each part of your die cuts. I used Dried Marigold on the frame.


Then I used Brushed Corduroy on to the handles.
Then Hickory Smoke on the wheel.


I then attached this to my background.


Before adding the basket, I stamped on my sentiment as I wanted to raise the basket. This would have stopped me being able to use the Misti.


Once stamped I then colour my basket in Antique Linen and again added shading with Brush Corduroy. Using mounting tape I positioned it on to the bike. Using a white Jelly Roll pen I added high lights to the basket and wheel.


I found some spare die cuts from my build a cart card, featured last week. I popped them in the basket. but you could use anything and ink them with your pads.


Lastly I added, a Sparkle Pen and  Crystal drops to my "enjoy" sentiment.


I hope you enjoyed this weeks blog post,
I'll be back next week with a quick and easy Thank you card

Happy Paper Crafting and God Bless
Jo
xxx


Wednesday 18 August 2021

Sometimes Craft Product Bring on Happy Memories & Inspire You! Working With The Market Cart Builder Die From Honey Bee Stamps.

 Well Hello And Welcome

With so many beautiful releases this month, I found it hard to choose which on to showcase for you. But this little cart made me smile as my brother used to own a cart very similar. As a child I would sometimes go with him as he rang his bell and walked his round selling his flowers. So this Die and Stencil, combination is a perfect to send to him to tell him what an awesome big brother he is. My Best Friend.

Products

Market Cart Builder Die ( Honey  Bee Stamps)

https://www.bumbleberrys.co.uk/collections/new-releases/products/market-cart-builder-honey-cutshbs?variant=39448924913746

Market Cart Builder Stencil ( Honey Bee Stamps)

https://www.bumbleberrys.co.uk/collections/new-releases/products/market-cart-6x6hbs?variant=39448924880978 

Crafty Stamps ( Honey Bee Stamps)

https://www.bumbleberrys.co.uk/collections/new-releases/products/crafty-buzzword-4x4-stamp-sethbs 

Medium Or Mini Cloud Stencil (MFT

https://www.bumbleberrys.co.uk/products/stencil-mini-cloud-edges?_pos=7&_sid=5eb393672&_ss=r

Grassy Edges Slimline Stencil (MFT)

https://www.bumbleberrys.co.uk/collections/my-favorite-things/products/slimline-grassy-edges-stencil

Cardstock In

 Guava, Cilantro, Noble Fir ( Lawn Fawn)

Wild Dandelion and Slate ( Gina K)

Sea Glass and Kraft ( Concord & 9th)

Dye Ink's In

Red Hot, Sweet Mango, Jelly Bean Green, ( Gina K)

Sea Glass ( Concord & 9th)

 Unicorn White Pigment Ink ( Hero Arts)

https://www.bumbleberrys.co.uk/products/hero-arts-hues-unicorn-white-pigment-ink?_pos=14&_sid=1ae42e6e4&_ss=r&variant=12640273596498 

Detailed Blending Brushes ( Altenew)

https://www.bumbleberrys.co.uk/collections/altenew/products/detailed-blending-brushes?variant=39258578485330

Distress Oxides (Ranger) In

Salvaged Patina, Twisted Citron, Mowed Lawn

Sparkle Pen (Spectrum Noir)

Fine Hemp Cord 

Eyelet coloured with Calming Aqua Crystal Drops (Nuvo)

White Gelly Roll Pen (Sakura)

Card Stock Cut To 5 1/2" x 5 1/2 " (Neenah 80lb)

https://www.bumbleberrys.co.uk/products/neenah-classic-crest-80lb-8-5x11-25-pk?_pos=2&_sid=20735db8d&_ss=r

6 x 6 Inch Card Blank

Download From Honey Bee Stamps

https://honeybeestamps.com/products/market-cart-builder-honey-cuts


Method

First, I die cut the cart.

Then I choose my cardstock and die cut all the elements.

Using the stencil I added colour to your cardstock. I used the detailed blending brushes. Firstly Sea Glass ink on the Sea Glass cardstock I had used. Then moving the stencil, as it has two different strips I then added the white pigment ink.


Then attach to your card, I use acrylic blocks to hold in place why it dries.

I Carry on adding the elements.


When adding the wheel I used an eyelet and coloured with Nuvo drops. This way the wheel still rotates.


I continued to add all the other elements, and the flowers I blended them, with die inks for contrast ( I seemed to have lost this photo)


 On a piece of white cardstock cut to 5 1/2" x 5 1/2", I blending my oxides with stencils to create the background..


Next I added mounting tape to the back of my cart.


This was then added to my background.

Finally I mounted the whole thing to my card blank.


I made this little sentiment using the sentiment stamps and twine. Also I made little stiches around the sides of the cart. 

I hope you enjoyed this weeks blog post with me, next week is more die cutting fun from Honey Bee Stamps.

Happy Paper Crafting

Jo

xxx


Wednesday 11 August 2021

Playful Card For Our Fellow Crafty Friends Using Honey Bee Stamps latest Release. ( Also Stretching Your Stencils)

 Hello and Welcome Crafty Friends,

I love making cards for fellow crafters because they appreciate the time and effort you put into the cards. I just love the "Lets Get Crafty Stamps" from Honey Bee's.

Products

Lets Get Crafty Stamps (Honey Bee Stamps)

https://www.bumbleberrys.co.uk/collections/new-releases/products/lets-get-crafty-6x8-stamp-sethbs 

Lets Get Crafty Honey Cuts (Honey Bee Stamps)

https://www.bumbleberrys.co.uk/collections/new-releases/products/lets-get-crafty-honey-cutshbs

Crafty Buzzword Stamps (Honey Bee Stamps)

https://www.bumbleberrys.co.uk/collections/new-releases/products/crafty-buzzword-4x4-stamp-sethbs

Crafty Buzzword Honey Cuts (Honey Bee Stamps)

https://www.bumbleberrys.co.uk/collections/new-releases/products/crafty-buzzword-honey-cutshbs

Shiplap Siding Panel (Honey Bee Stamps)

https://www.bumbleberrys.co.uk/products/shiplap-siding-background-stencil?_pos=1&_sid=04b9d8fe9&_ss=r

Distress Oxide In Pumice Stone (Ranger)

Crystal Gems Stickers (Honey Bee Stamp)

https://www.bumbleberrys.co.uk/search?q=crystal+gem+stickers

Intense Black Inkpad (Honey Bee Stamps)

https://www.bumbleberrys.co.uk/collections/ink-pads/products/intense-black-ink-pad-honeybee

Alcohol Markers (Any)

Scraps of Black and White Cardstock For Die Cutting

80 lb Neenah Cardstock for Stamping and Colouring Images.

https://www.bumbleberrys.co.uk/products/neenah-classic-crest-80lb-8-5x11-25-pk?_pos=2&_sid=fd8cdf79e&_ss=r 

Crystal Glaze or Glossy Accents

6 x 6" Card Blank

Method

Firstly I wanted to create a background that looked like grid paper, so using the lines on the Shiplap Siding Stencil and Pumice Stone Inkpad. I blended first horizontally then vertically to achieve the look of a grid. I used a 6 x 6" card blank as the base.

I then stamped and die cut out my chosen images.

Die cut my sentiment, and layered it together with the shadow layer.

Stamped out my sub sentiment and used a paper trimmer to tidy them up.

Next I played with the placement of my design. Then added mounting tape to some of the images to create dimension.


Finally once everything was in place I added Gems and Crystal Glaze.

Thank you for Popping By

 and Happy Paper Crafting

Jo

xxx


Wednesday 4 August 2021

Using A Large Sentiment To Make A Statement. Three Cards, That Take Minutes To Make.

Good Morning Crafty Friends,

I love the look of less is more, but sometimes I struggle to achieve it. But with big sentiments, that takes the problem away, as their size fills the card front. Also  creating massive impact. I couldn't wait to get my hands on the Giant Happy Birthday To You  Die from Lawn Fawn.

 I came up with three quick ways to change the look.


Products

Giant Happy Birthday To You  Die (Lawn Fawn)

https://www.bumbleberrys.co.uk/collections/new-releases/products/giant-happy-birthday-to-you-lf

Die Namics Star Dies (MFT) Any Star Dies Would Work

 110lb Card Stock (Neenah)

https://www.bumbleberrys.co.uk/products/neenah-classic-crest-110lb-8-5x11-125pk?_pos=1&_sid=bc5b4ce16&_ss=r

6 x 6 " Card Blanks Black and White


Card One, Look One

A Rainbow Of Inks (I used Gina K Inks in  Red Hot, Tangerine Twist, Wild Dandelion, Key Lime, Blue Lagoon.)

https://www.bumbleberrys.co.uk/collections/gina-k-designs/products/gkd-ink-cube-red-hot

Blending Brushes

Card Two, Look Two

Glitter Cardstock 

Card Three, Look Three

Pattern Papers

Method

Card One

Die Cut The Sentiment Die 4 Times. 

Also cut any other dies out of Neenah card stock.(Stars)


Then layer three of them on to of each other with liquid glue so you have  wriggle room. This is the basic of all three card examples.

With layer Four, slowly blend your inks in rainbow order, and any other embellishment dies your going to be adding. (stars)

Add to your card blank, the die has four layers so stands out, But I did use sticky pads under the stars.

Card Two

Glitter Cardstock

Exactly same as above but the top layer is cut from Silver Glitter cardstock , instead of the blended rainbow, then mounted on a black card blank.

This one would be great for the males in our life.


Card Three

Patterned Paper

Again same as above cards, except the final layer is pattern paper.
When adding the patterned paper to the three layers of cardstock die cuts hold down them down with an acrylic block until they are die.


I have die cut a few more ready for those quick make cards, when you realise its some ones birthday the next day. (Panic Right)
Just colour, or stick the top layer on and your ready for any ones birthday.

I hope you enjoyed todays blog 

Until Next Week Take Care and Happy Paper Crafting

Jo

xxx


Followers