Wednesday 28 July 2021

Embossing and Debossing with 3D Embossing Folder From Altenew For A Letter Pressed Look.

 Hello and Welcome Crafty Friends,

to this Wednesday Blog Post, for Bumbleberrys. 

Today I've been playing with the 3D embossing folders from Altenew. Finding different results depending weather you use the negative or positive side also known as Emboss or Deboss sides. These cheaper product are so versatile, there  a great resource in your stash.

Products

Monstera Leaves Embossing Folder (Altenew)

https://www.bumbleberrys.co.uk/collections/altenew/products/monstera-leaves-3d-embossing-folder

Blending Brushes (Altenew)

https://www.bumbleberrys.co.uk/collections/altenew/products/ink-blending-tool-large 

Brayer (Ranger)

https://www.bumbleberrys.co.uk/products/tim-holtz-distress-brayer-medium?

_pos=1&_sid=cbc21ba1c&_ss=r

Monstera 3D Die Set (Altenew)

https://www.bumbleberrys.co.uk/products/monstera-3d-die-set?_pos=15&_sid=9f968face&_ss=r&variant=31851762745426 

Simply Hello Die (Altenew)

https://www.bumbleberrys.co.uk/products/simply-hello-die?_pos=5&_sid=814121065&_ss=r 

Distress Oxide Ink Pad in Twisted Citron & Mowed Lawn (Ranger)

White Gouache Paint (for splats)

Varies Pre made Nuvo Drops

Method

Firstly ink up the folder with your darkest colour. I used a brayer to apply the ink to the debossed leaf side.


 Then close the folder and run this through you die cutting machine with the correct sandwich / platform for your machine to take 3D embossing folders.


Next using the brayer with the darker ink colour I gently went over the leaves that were raised.


Die cut my sentiment 3 x and glued them together to create a chipboard style word. Layering makes it thick and solid.

I then place an acrylic block to hold it together until all layers were dry.


Then once it was dry I ink blended  in the two ink colours lightest first.


Added some slats by squishing down my inkpad an adding water with a fan brush. 


Once I had added mounting foam to the back of the word die I added it to my card. 

Die cut the Monstera leaf die, coloured with a blending tool and added to the sentiment.  

My other card shows this technique opposite way round where you ink the leaves first. 


Also on the second card I kept the die cut plain and splat with white gouache.


Thank you for joining me, until next time happy paper crafting!!!

Jo

xxx


Wednesday 21 July 2021

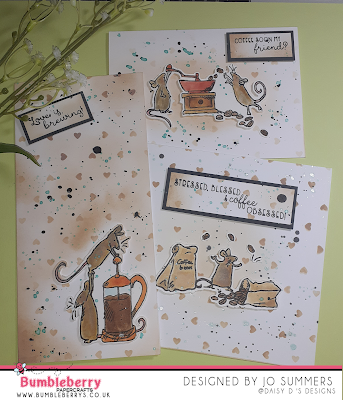
Three For One with Coffee House Stamps and Dies.

 Hello and Welcome,

Anita Jerim images are amazing again with the delightful Coffee House Stamps and Dies.

So even though I trying to improve with my zigs, I feel that these stamps and dies needed water colouring with my Distress Oxides and Distress Inks.

Products

Coffee House Stamps (Colorado Crafts)

https://www.bumbleberrys.co.uk/collections/colorado-craft-company/products/anita-jeram-coffee-house-6x8-ccc 

Coffee House Dies (Colorado Crafts)

https://www.bumbleberrys.co.uk/collections/colorado-craft-company/products/anita-jeram-coffee-house-dies-ccc

Teeny Hearts Stencil (Altenew)

https://www.bumbleberrys.co.uk/collections/altenew/products/teeny-hearts-stencil 

Water Colouring Brushes (Altenew)

https://www.bumbleberrys.co.uk/collections/pens-and-markers/products/artists-watercolor-brushes-bundle 

Jet Black Ink Spray (Altenew)

https://www.bumbleberrys.co.uk/collections/altenew/products/jet-black-ink-spray

Bristol Smooth 270 gsm ( Strathmore)

Obsidian Inkpad (Altenew)

Black Card Stock

Distress Inks (Ranger) Various Colours 

Distress Oxides Inks (Ranger) Frayed Burlap & Salvaged Patina

Various Size Card Blanks 

Method


Stamp out you're images on to water colouring paper.


Die Cut them with the coordinating dies.


Then choose your palette.


Add double sided foam to the back of your images.


Then stencil the Teeny Heart stencil with Frayed Burlap Oxide, and with a blending tool soften the edges of the card blank. 


Stamp out the sentiments, and again stencil on hearts or blend around the edges then matt and layer with black card stock.


Once all the card is assembled add splats with black spray (remove the nozzle) and flick and Salvage Patina Oxide watered down and a paint brush.


Thank you for visiting and until next week,
Happy Papercrafts.

Jo
xxx


Wednesday 14 July 2021

Sending Some Happy with the June Release from Concord and 9th

 Hi There and Welcome 

So today I'm happy to show you the June release of Concord and 9th.


Products

Rainbows Sayings Stamp Set (Concord & 9th)

https://www.bumbleberrys.co.uk/collections/new-releases/products/rainbow-sayings-4x4-stamp-set-concord

Stitch & Strings Die Set (Concord & 9th)

https://www.bumbleberrys.co.uk/collections/new-releases/products/rainbow-stitches-strings-dies-concord

Neenah 110 Cardstock for Background Cut to 5 3/4" x 5 3/4" plus a scrap for the tassel's.

Cardstock  (Concord & 9th) in ,Honeysuckle, Sprout, and Aqua Sky

Inkpad ( Concord &9th) in, Honeysuckle, Sprout, Aqua Sky & Dove

Card Blank 6 x 6 "

Method


First I took the rainbow stamp, layers and stamped a random background.

Lining each colour as I went.

Once the rainbows were complete, I added my sentiment.

The next stage was die cutting the rainbow dies using the same colour cardstock as I'd used inks. The tassels I cut from white 110lb Neenah cardstock.


I then carefully line up the cardstock layers on to my background. Don't glue the ends of the rainbow as you will be adding the tassels.


Before adding the tassels I used a blender brush t shade them in Dove inkpad.


 I hope you enjoyed today's blog, I'll be back next Wednesday with some more samples for Colorado crafts.

Happy Paper Crafting

Jo

xxx


Wednesday 7 July 2021

Coming Up With A More Masculine Colour Combination.

Well Hello, and Welcome to this weeks blog post. 

Many of us struggle when it comes to cards for men.

With the May release from concord and 9th last month, I fell in love with Sketched Dots Turnabout stamp. It has a contemporary feel to the design. In fact it is a great starting point to a more masculine card.

Products

Sketched Dots Turnabout Stamp (Concord & 9th)

https://www.bumbleberrys.co.uk/collections/concord-9th/products/sketched-dots-turnabout-6x6-stamp-concord 

Everyday Sayings Dies (Concord & 9th)

https://www.bumbleberrys.co.uk/collections/concord-9th/products/everyday-sayings-dies-concord?variant=39389195927634

Inkpads In Oceanside, Aqua Sky, Stardust and Dove (Concord & 9th)

White Cardstock 110 Cut to 5 1/2 " squared for turnabout background and extra for sentiment die cutting.  (Neenah)

Cardstock In Oceanside & Aqua sky (Concord & 9th) 

Pearlescent Vellum (Lawn Fawn)

https://www.bumbleberrys.co.uk/collections/lawn-fawn/products/cardstock-vellum-pearlescent?variant=29789027434578 

Crystal Drops in Aqua Plans & Calming Aqua ( Nuvo)

6" x 6" Card Blank

Method

After collecting your supplies or alternative supplies you are ready to proceed.

First following the steps create your Turnabout background. I cut my cardstock down to 5 1/2 " squared.


I used four colour of inks as listed above.


Each turn is another colour until all four turns are complete. Clean stamp each turn to stop contaminating your inkpads.

Why the background is drying, I began my die cutting. First the Large HELLO from Aqua Sky cardstock, and then three times out of 110 thick cardstock. 


Then from Oceanside Cardstock I cut the FRIEND  Die.


Once all the elements are placed on a 6" card blank. I then added the crystal drops, and  Jewel Drops.

I hope you enjoyed todays blog post and feel free to message me though the Bumbleberry Craftroom Group, Go to our Facebook page and go to group.


 I'm always happy to help.

Happy Creating 

Jo 

xxx  


Followers