Wednesday 29 May 2019

Bring Out the Sunshine by Birdie Brown using Vintage Hues to achieve a Rustic feel to your Card Making.

I'm So happy to see you, popped on over to my blog today.
Welcome Crafty Friends,
I was as usually, eagerly awaiting the latest release from My favourite things this month. Hoping Birdie Brown, would have brought us a new design. I wasn't disappointed, Bring out the Sunshine is an adorable stamp set.


This Little lady reminds me of Holly Hobby back in the seventies.
I loved the character as a child, and had a bag with the dolly in its pocket.
I love that you can mix and match Birdies characters, to build a whole group of people. (Idea for another blog post)
Today I wanted to give my card a rustic, vintage feel by using certain colour hues.
Hues, are colours on the colour wheel. Every colour on the colour wheel can be altered in three different ways. Tinting, Shading, and Toning. (you may all ready know this)
Your colour mediums have very different, shades and tones.
Usually referred to as Brights, Skin tones, Pastels, and Vintage.
These are a set of colouring mediums that work for those type of themes.
So enough about colour theory, and on to the card.


Products
MFT Bring Out The Sunshine Stamp Set  By Birdie Brown

Coordinating  Dies

Kraft Card Blank
Tim Holtz Chevron Builder Mask
MFT Paper Pad Fresh Squeezed Chevron
Alcohol Markers 
Hero Arts Unicorn White Ink Pad

White Embossing Powder

Nuvos In Glossy White and Metallic Wedgwood Blue
Doodlebug Tiny Hearts Puffy Stickers in white.
Lace and Trim from my Stash

Method


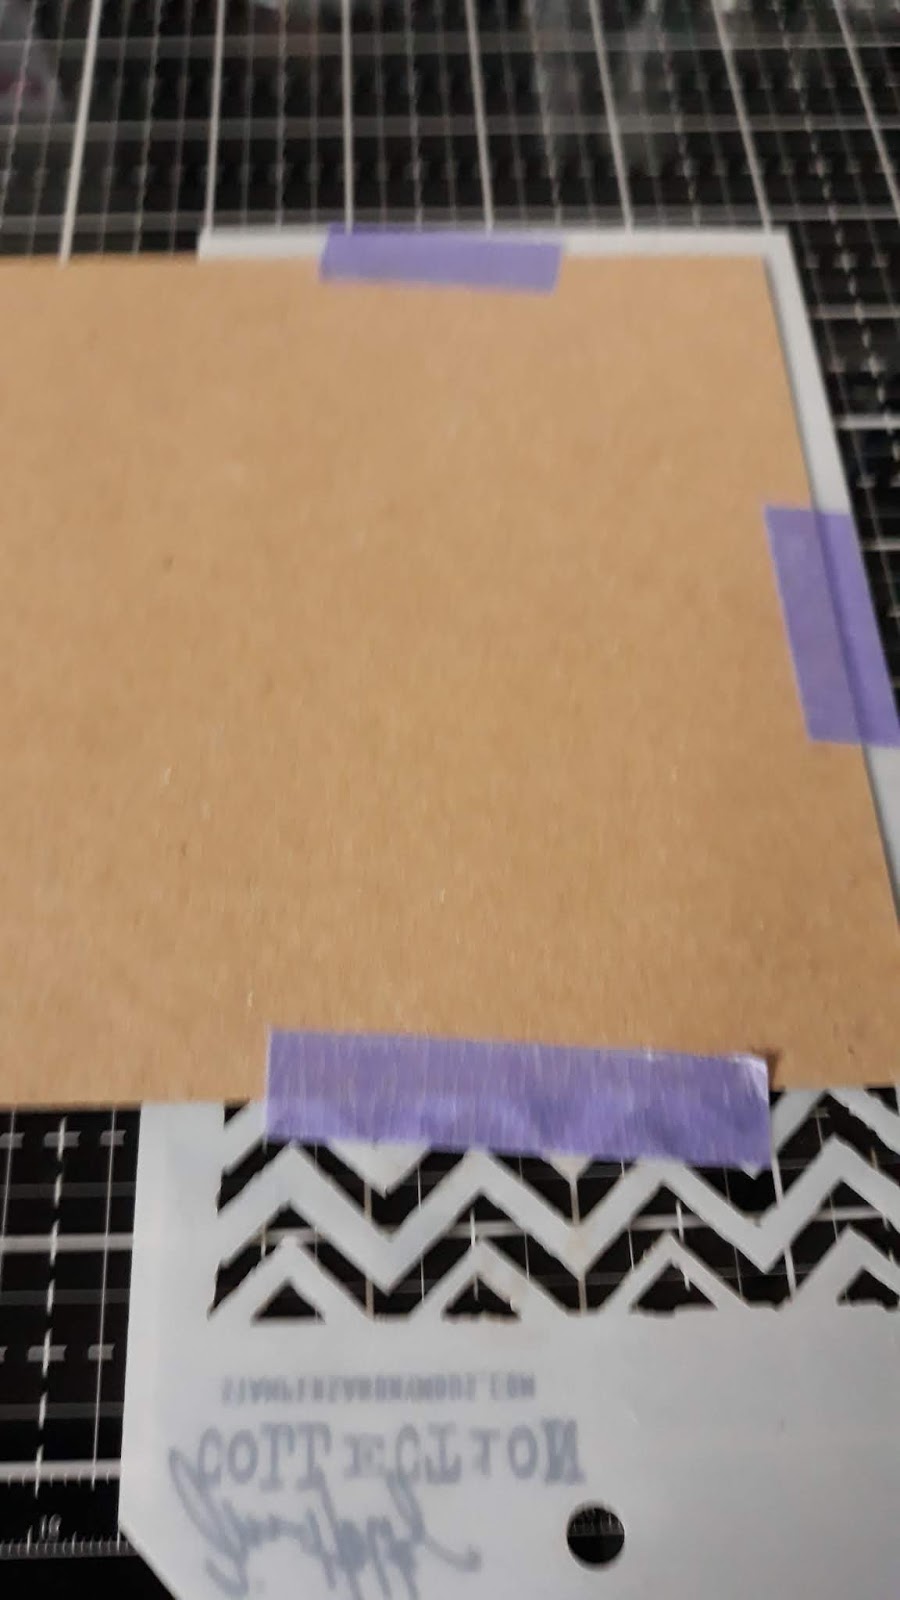
Tape your stencil (mask) to your card blank.


Blend over it with the hero inks Unicorn White ink.


Stamp and die cut your images.
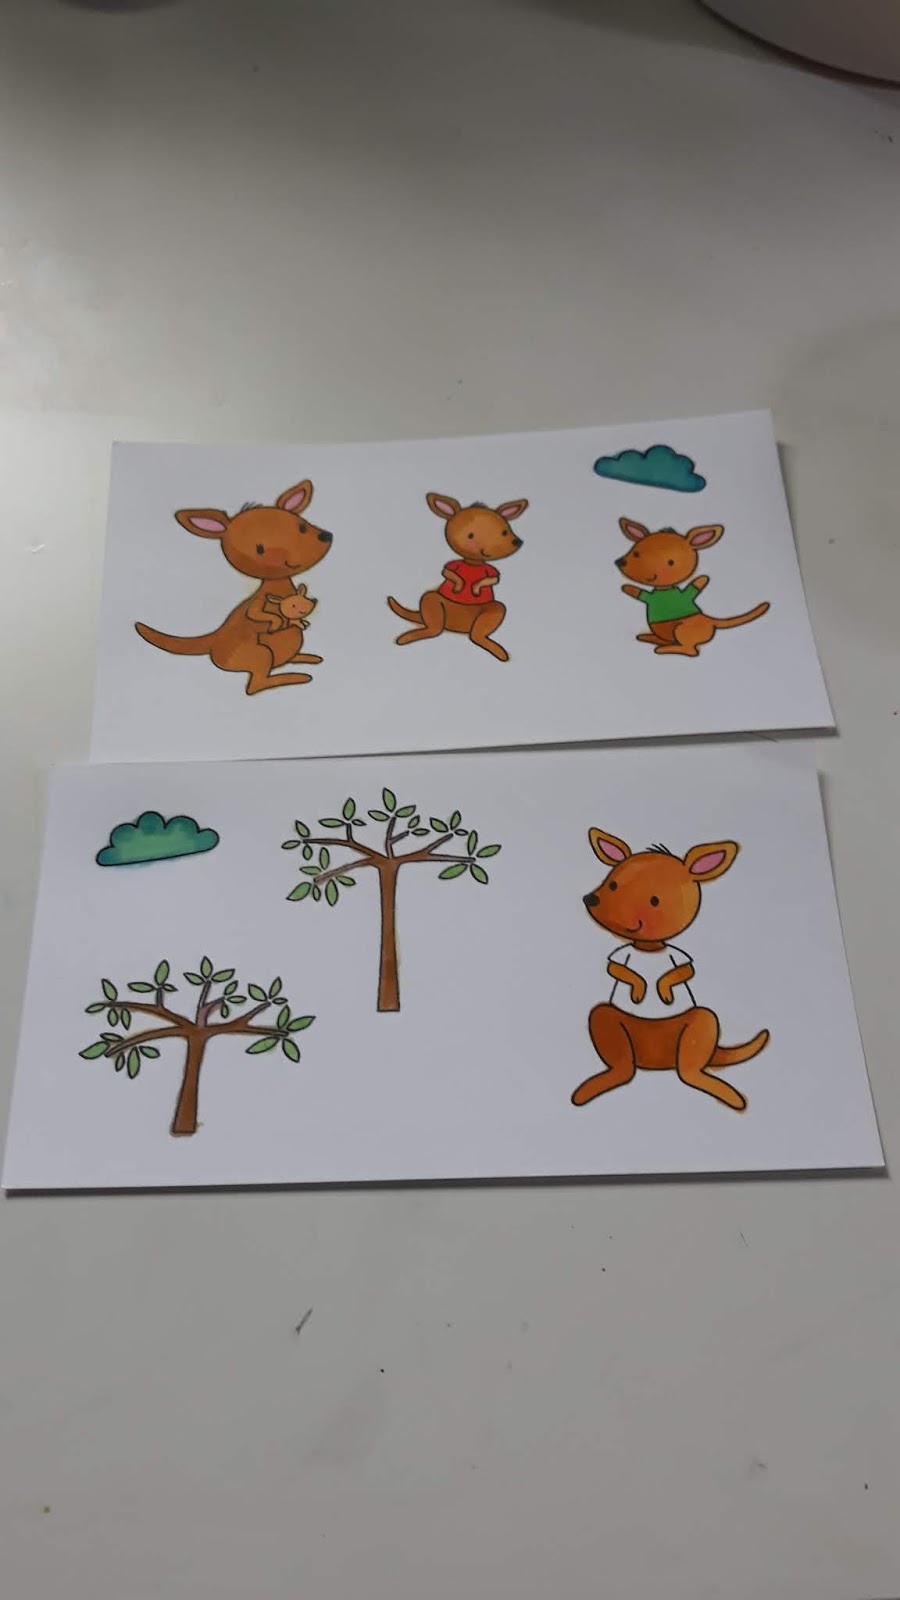
This shows you two different colour Tones creating a total different feel. 
The one on the right, is be done in vintage colour alcohol markers.
To create the shadow under her hat, i used a light purple. ( Spec DP3)


I then started finding bits and pieces to work with that rustic look.
From Pattern papers, Lace Trim, Burlap, Hessian etc.....
I used a tiny piece of lace on the bottom of her dress.
I played with the arrangement until I was happy with the look.


I then embossed the sentiment, in white on a scrap of Kraft Card Stock.
Added Nuvos and Stickers.

Thank you again for popping on over
Happy Stamping
Jo
xxx


Wednesday 22 May 2019

The Kangaroo Gang Are here to play, using bubble wrap back ground. Also Bonus Card using the Latest Release from Waffle Flower

Hello There, My Crafty Friends.
This week I decided to play around with making backgrounds
                                                                                                                                       

 Memento Inks                                                                                                                  Kaleidacolor

 Using Different Ink Pads I started to come up with so lovely combinations.
 Then I tried with Oxides and they were just as impressive.

 Here I created a rainbow pattern.


 I did a first and second impression, this is called first and second generation stamping.
First you lay down your ink on to the bubble wrap.(Free from inside my Bumbleberry, order envelopes.)
Then take a piece of Neenah card stock lay it on top, Then a piece of white copy paper.
Gently rub over the top. When you remove the top you will have a great first impression, repeat to
end up with a less vibrate image.
I think your agree this makes a fab funky back ground.
Here are some of the cards I made with these back grounds.


Today I will be focusing on the MFT Kangaroo gang play date card. 

Products

Memento Inks in Dandelion, Tangelo, Morocco (any Die ink pads would be good) 
Free Bubble Wrap (inside your order envelopes) 
Orange and Yellow card stock
White embossing powder
Alcohol Pens
Neehan card stock 110lb
Nuvo drops in Ripened Pumpkin, Dandelion Yellow 

Method

After added my back ground to the card, I cut a circle (approx 4 in)
Then I stamped out my images on Neehan 110lb card stock, fussy cut them out, but we do have the matching dies in stock.


I started laying out my design, stamped and embossed my sentiment.


Then I cut out the letter dies out of yellow card stock, to spell out the words Play Date. But any sentiment could be used.
I attached everything in the right place, and finished by using my nuvo drops.

The other bonus card on here is from Waffle Flower.
Go Girl Combo, this was made for a good luck card for my youngest daughters, final performance of the year at collage.
Go girl Stamps and Die Combo
https://www.bumbleberrys.co.uk/collections/waffle-flower/products/go-girl-combo

Happy Stamping
Jo
xxx


Wednesday 15 May 2019

Three Different Masking Techniques, using the Latest Honey Bee Stamps Release.

Well Hello There Crafty Friends,
Stencils have now become as popular as stamps. 
We no longer think of them just for back ground builds.
With so many exciting new ideas, I thought I show case 3.


 Card One
Blending and Die Cutting


 Card Two
Blending and Stamping


Card Three
Blending and Adding Texture Paste/Glitter

Products 

Honey Bee Stamps Hexagon Patterns

Coordinating Dies

Hexagon Stencil

Happy Birthday Sentiments 

Neenah 80lb Card Stock

 Thank You Die

Distress Oxides

 Card One (Fossilised Amber, Evergreen Bough, Iced Spuce)  
Card Two (Squeezed Lemonade,Evergreen Bough,Tumbled Glass, and Wilted Violet)
Card Three ( Canded Apple, Carved Pumpkin, Squeezed Lemonade, Mowed Lawn)

Sparkle Textured Paste  or  add Glitter to Normal Textured Paste

Various Nuvo drops

Altenew Black Ink spray (Card One)

Wow White Embossing Powder
Black Card stock
Black and White Washi Tape (Card Two)

Method
Card One

Attach your White Card Stock to your Large Hexagon Stencil.


Blend on your Distress inks


Splatter your Black spritz from Altenew or any black paint. I take the spray out and use the pump to flick.


When its dry, I die cut the Hexagons out of the pattern. I smudged mine, so it may be better to do this stage before adding sentiment and nuvo's.


Add to your card blank using Mounting Tape or Funky Foam sheet, I used a C6,
(A6)


Then  Stick pieces back into pattern, were they will look sunk.


Finally stamp  and emboss the sentiment, in white embossing powder on to black card stock.
Die cut and mount on to card.
Add your Nuvo drops in similar colours to your background.

Card Two
Follow the same steps, with the stencil, But using the colour combo for the card Two.
Then use the splashing with water technique.


Instead of die cutting, stamp in Hexagon shape Stamp in black, 
on three random shapes that are side by side.


Stamp your sentiment


Add to you card blank and add heat embossed sentiment, washi tape and Nuvo drops in black.

Card Three

Stencil on a 5" x 5" panel of neenah 80lb card stock.
Using the combo for card Three


While the mask is in place add a layer of textured/embossing paste.
Remove then wash mask thoroughly.


When its dry use a sentiment die in black to stand out on your stencilled panel.


I do hope you've enjoyed seeing, different techniques, when using your stencils and how versatile they can be. 

Thanks for popping on over 
Happy Stamping
Jo
xxx


Tuesday 14 May 2019

Creating Backgrounds Distress Oxides on Glossy Card....

Good Morning, 
well I'm super excited as a stumbled upon a new technique. Using Distress Oxides, on Glossy card Stock.
I'ts the same as your Alcohol inks but using your distress Oxides. Pads and Refills.
Let me explain,


 Distress Pads on Gloss card stock                                              Distress Re-inkers on Gloss card stock


                                                    Distress inks on normal card stock.


First on glossy card stock, I drop on a few different greens.


Using a straw a a few drops of water, I start blowing, as you would with Alcohol inks. before adding more colour make sure its dry. I use a heat tool. When its dry, over night is a good time. Use a mini blender and Distress Micro Glaze.


Alternatively

If you don't feel comfortable you can use your pads. Stamp the pads on your surface and spritz with a little water. Then pick up some colour and dry each layer.
This can then be dried and used as it is.
  
Another Idea ive been doing lately, is I receive a huge amount of Bubble wrap, and I thought I give it a go. Using as a stamp with different inks, I was very happy with the results. See what you think.


I made a few examples with dye based inks to, which will be used on a few Design Team projects for bumbleberrys in future posts.
OK, sneak peek!


I think this works so well as a background and its free. 
Happy Stamping 
Jo
xxx

Wednesday 8 May 2019

Using Die Cut, Border Elements on Your Designs, Also a bonus card using Zig Real Brush Markers..

Well Good Morning Crafty Friends,
I'm back to day with how to add Die Cut images to your design.
Using the MFT Die Stitched Ric Rac.


Products
Ric Rac Dies as above in the link.
6 Scraps of Rainbow Coloured Card Stock  and Matching Nuvo drops
MFT Pure Innocence Stamp (Bundles of love)
Bristol smooth card stock or Water coloured card stock.
Zig Clean Color Markers


I matched all my Card Stock,Pens and Nuvos ready to use together
(As close as possible)
Die cut the Ric Rac die, out of the 6 colours of card.
Stuck them on to the card blank.
6 x 6 blank 


I stamped my image, coloured it then fussy cut her out.
Took a strip of white card stock and stamped my sentiment
In Black ink.
Added them to the card with double sided mounting tape.
Adding the little bee from the set straight to the card.
Finally I added on the Nuvo drops.


Also on the same day I made a quick water coloured card using the same pens,but on Tim Holtz water coloured card stock.
Splattered with Gansai Tambi Stary Colours Gold.


I hope you enjoyed this post, and ive inspired you to dig out your border dies and look at them a different way.
Happy Stamping 
Jo


Followers