Wednesday 29 July 2020

A Different Look To A Slimline Card, Using The Latest Release From Honey Bee Stamps

Hello My Crafty Friends,
I hope you all well, and keeping safe.
I have a another on trend slimline card for you, but today were turning on its side.


Products
Honey Bee Stamps Raise A Glass Stamp
Honey Bee Stamps Slimline sentiments Eyelets
Embossing Ink Pad
White Embossing Powder
Ranger Distress Inks (rainbow choice of colour)  
Gina K Cardstock In Copper
Neenah Cardstock 80lb
Neenah Cardstock 110lb for Card Blank. (cut at 7" x 8 1/2 " scored at 3 1/2)
Envelope Size DL or Business Size.
Double Sided Mounting Tape or Squares
Alcohol Markers
Glossy Accents
Nuvo Crystal Drops Copper Penny Drops
White Jelly Roll Pen
My Favorite Things Ice Cubes Gems
Lucy's Little Things Multi Coloured Gems

Method


Using the slimline and eyelet die cut the center out of neenah 80lb cardstock. 


Line up your stamps of the glasses alone a line so they are all in a row.
Stamp them in versamark or embossing inkpad.
Then emboss in white embossing powder.


Blend on your rainbow of ink over your stamped image.
Then add a splatter of water and using a paper towel lift of the colour. This creates a splattered look to your work.


Then using the coordinating stamped solid image to your glass, using the same ink colour as the background fill in the middle of the glass.


Die cut the frame and inner area out of the copper card stock, then place the boarder on to slim line card blank.
 Use the inner piece to attach to your work using double sided mounting foam. This add's depth to your design. 


Matt on your rainbow glass design.
Then die cut your sentiment font, as their are a few in the set to choose from.


Before adding to your card front add some stamped in alcohol friendly ink and alcohol coloured images in and around your glasses.
Then add glossy accents to the glasses themselves and I added so little ice cube accessories from MFT that I had but there are other gems you can us.
After it all dried. I added my HAPPY sentiment plus an 18 as this is for a daughters friend.
I also added some white dots, multi gems and some nuvo copper penny drops around my work.
I had to stop myself from over embellishing.


I do hope you enjoyed this weeks cards.

Happy Stamping 
Jo
xxx

Wednesday 22 July 2020

Quick and Simple Card Using Minimal Craft Supplies

Morning All
I have been blown away with all the summers releases. So many amazing products. But my aim today is a very quick and simple but beautiful design. 


Products
MFT Big Balloon Stencil
Mama Elephant Sentiment Stamps (Scripty Birthday Stamps)
Gina K Inks In Red Hot, Tangerine Twist, Wild Dandelion, Key Lime, and Blue Lagoon.
White Gell Pen
Versafine Onyx Black Ink Pad
Fine Black Pen
Bristol Card Stock Cut Just Shy of 4 x 6"
4 x 6" Card Blank
Little Sequins Clear Iridescent

Method


Cut your Bristol Smooth cardstock or similar and start blending your inks on to your cardstock.
making sure than they over lap.
,

 Add more ink to make them stand out and hand draw your ribbons on those that are showing.


Matt this on to your card blank.


Add high lights using your white gell pen. Then stamp your chosen sentiment in Versafine ink. 


Finally add your embellishments, I used sequins.
I think your agree a very clean and simple design, but beautiful in its own right.

Take Care and Happy Stamping
Jo
xxx

Wednesday 15 July 2020

I've got a stamp set now WHAT!!!! featuring the Main Squeeze Stamps from MFT

Hello there,
Hope you all well, 
This weeks blog is a technique I've done many times. But I have recently found how to improve that technique. (Building a Background)
So you've received your stamp set and your thinking what next?

1) Firstly I see what size the images are, will they cover the card, or make up part of it.

2) Then what colours would work with those images.( Nature, Beach, Countryside, Industrial) So,  If you got a ruff idea, like the fruit  then colours etc will come with the theme. 
Or you can totally go out the box for a totally unique design. 

3) How will I lay my card out to achieve an eye catching look to my work. Basically what looks pleasing to the eye, balance, number of images etc. I was thinking of a pattern on a table cloth when I made this. The print designer  would have done the same kind of design process. 

Now that can be daunting, I know I don't always achieve it after all these years. But practice makes perfect. There are also some amazing resources on you tube one is  https://www.youtube.com/user/czdesign
Where Cathy shows uses the rule of threes, sequin placement etc......


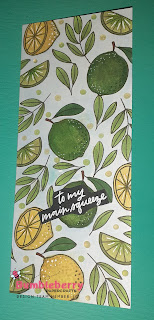
So lets start today's card featuring the citrus fruit, so I no there are many smaller stamps.
 I know that Lemons and Limes are featured therefore my colour palette is apparent. (unless your are more funky will your colour palette)
So I start to plan the space by decided the type of card (size) So I want this to be a fresh and trendy card.
 So I opt for the tall slim line also know as the DL card years ago.
So ive ruffly worked out where to start.

Products

My Favorite Things Main Squeeze Stamps
Neenah 110 lb Card Stock 7" x 8" scored at 3 1/2"
Black Licorice Card Stock From Lawn Fawn
 Super fine White Embossing Powder
Alcohol Pens and Pencils
Nuvo Jewel Drops in Lemoncello, Key Lime.
White Jelly Roll Pen

Method


As we discussed these are smaller images so we will use them together, to cover are card base. Which  I made using our Neenah Card Stock.

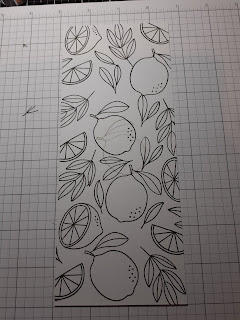
Then before I would just randomly stamp. not really worrying where each image would go, but now I mount all the images i'm going to use. Start at the corner and fit them in as a pattern, which saves great big white gapes. It is much more controlled as it becomes less random.I hope this makes sense.

I am hoping to do a video with the differences soon.


 I then coloured my images in the citrus fruit colours, with a mix of alcohol markers and polychromos pencils. I also used a light blue pencil to shade in the white back ground. It helps to make your images pop.
Then stamp and embossed my sentiment on to the black card stock.
added it to my card and added some beautiful Nuvo jewel drops. Also taking the white pen adding a few dots on the fruit as a high light.


Happy Stamping
and Thank You for Popping on Over.
Jo
xxx

Wednesday 8 July 2020

Stamping On Vellum, for a softer look to your cards. Using MFT Stamps and Papers.

Well Hello Crafty Friends,
I was recently watching a fellow crafter ( Carissa Wiley)  stamp on vellum and I was inspired by the beautiful soft look it gave to her work.
I been also trying to step out of my comfort zone to use different colour combinations as I said before.
So armed with the vellum this is what I came up with.


Products
My Favorite Things All The Encourage
My Favorite Things Paper Pad Positively Peppy
My favorite Things Tropical Flowers
Lawn Fawn Vellum
Altenew Ink Pads in Sun kissed, Mountain Mist, and Limestone.
Nuvo Drops in Gloss, Sugared Almond, Calming Aqua, and Oyster Grey. on Vellum flowers I used Nuvo Jewel Drops in Orange Marmalade, and Aqua Plans.
7 x 7 inch Square Card Blank
Neenah 110lb Card Stock
Grey Memento Ink pad for sentiment.

Method
Stamp your flowers on to the vellum using your Altenew inks and some on to neenah put these to dry as the flowers on the vellum can take 12 hrs or more. But it is so worth the wait. You could use a heat tool but I found it buckled my vellum. 


Next add your backing paper to your card blank.


Stamp and cut out your sentiment.


Once your flowers are totally dry, you can shape and mold
 them with an embossing tool.

Arrange these on your cards and add your nuvo drops a simple but effective design.

Thank you for poping on over 
Happy Stamping 
Jo
xxx


Wednesday 1 July 2020

Slim Line Cards using the Cute Baby Shark Die-Namics From My Favorite Things

Hi There Crafty Friends,
I promised to show you another card, using the cute Baby Shark Die Namic.
So here we go, I love this little guy.


Products
My Favorite Things Baby Shark Die-Namics
My Favorite Things Under The Sea
My Favorite Things Friends With Fins
My Favorite Things  Outlined Cute Clouds
My Favorite Things Stencil Make Waves 
My Favorite Things Sharky Sentiments
Neenah Cardstock 110lb Cut to 8 1/2" x 8" scored at 4"
Various Card Stocks in Different Colours.
Distress Oxide in Antique Linen, Gathered Twigs, Tumbled Glass, and Salty Ocean.
Pencils
White Jelly Pen
Wow White Embossing Powder
Sequins


Method

After you have cut and scored your card blank, and rip some low tack tape so it has a frayed side. Then blend in Antique Linen then gentle add shading in gathered twigs.


Also stamp on the acrylic block and add some water and spritz on to the antique linen.

  
Then using salty ocean and the wave stencil slowly blend down your layers of waves.


Then using tumbled Glass add a light blend to create a sky.
Next Die cut your shark and I did this out of neenah cardstock and coloured him with coloured pencils.


Then stamp and die cut any other elements you want to use.


I ended up not using all these.


Next I went back to my background and added stamped fish in the waves.


I Started to build my scene.
Then I die cut my clouds out of vellum.
Then finally I added my white pen to high light and add bubbles from the fishes. Stamped my sentiment on black card and embossed in white.


Opp's not forgetting the sequins.

I think your agree this guys got charm.
Happy Stamping
Jo
xxx

Followers