Wednesday 31 July 2019

Flowers, Images, Word Patterns Cards Created With Gina K's Wreath Builder Templates.

Hello There Crafty Friends,
If your like me, and a  huge fan of Jennifer McQuire.
Then you problemly seen her using the Gina k, Wreath Builder Templates.
As the name contains the word wreath we tend to think it is only for making flower wreaths.
But its so much more.
 I have been road testing it, and have used many different stamps. (Words, Images and Flowers).
I have 3 cards for you today.


 Creating A Background Pattern


A Frame


 Products

 Firstly I stamp and Embossed the Mermaid tail background and embossed it white embossing powder.


 I then add a wash of paint from the Altenew Paints. I then set this to the side to dry.


I then used Images from both stamp sets to create a patten to sit behind the main image.
I then coloured the Images in with coloured pencils.  


I stamped and coloured the Mermaid.

I then attached to the background and placed it on to a  square card blank.
Finally I stamped out the sentiment and added it to the card.

Card Two
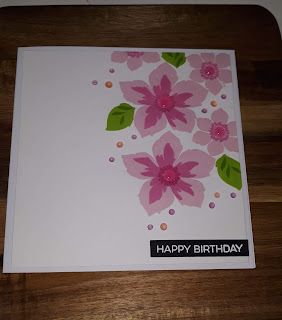
Pick a corner of your card, this card was cut to 6" x 6". Add a x to that corner and as you rotate your card, make sure the x is fitted in to the template.
I'm hoping my pictures will explain it better.


 I masked each flower before stamping the next.
Once finshed I cut this down to fit a C6 card blank.


Stamped the sentiment in the centre of the wreath.

Products
Altenew Beloved Daisy
Altenew Better Together Stamps
Altenew Ink Pads In, Pink Diamond,Pinkalious,Rubelite
Black Nuvo Drops
Pink Gems


The Last example I have for you is using, word stamps
I used .

MFT From The Heart Stamp Set
https://www.bumbleberrys.co.uk/search?q=from+the+heart+stamps
Gina k Inks
Ocean Mist,Key Lime,Wild Lilac, Sweet Mango,Bubblegum Pink.

 I marked a cross to show the centre. Then lined up my words to create a even spead on the background


I hope you have enjoyed looking at ideas, of how amazing this little tool really is
. I made about 7 cards but had to narrow these down to these 3 today. 

Happy Stamping 
Jo
xxx


Wednesday 24 July 2019

Have a Sun Shiny Birthday in The Pool, with The Latest Birdie Brown Release From My Favourite Things.

Hi There Crafty Friends,
As promised I'm back with the MFT Pool Die today, in the way it was intended to be use.
I will also be using a technique, I've shown before on how to create a stunning glossy look using your Distress Oxide Pads.


PRODUCTS
My Favourite Things Swimming Pool die 
My Favourite Things Drink Up The Sunshine Die (Birdie Brown)
MFT Paper Pad Black and White Basics
Alcohol Ink Glossy Card Stock
Distress Micro Glaze 
Neenah 80lb Card Stock
Distress Oxide Pads
Mermaid Lagoon
Tumbled Glass
Peacock Feathers
Water Spritzer
Black and Grey Card Stock
Wow White Embossing Powder (fine)
Alcohol Pens
Nuvo Drops in Aquatic Mist

METHOD

Choose your colours from your Oxides.


Get a sheet of Alcohol Ink Cardstock


Smooch your ink pads down on your craft mat.
Then spritz with a little water.


Pick up the ink on to the glossy cardstock, and dry between layers.


Keep building up the layers then let them dry.


Then die cut out the swimming pool, using the die.


I added this to another die cut, of the same die. This was cut out of grey card stock to create a stone look around the pool.
I then added it to my 6" square card blank that I had covered in a piece of paper from the basic paper pack. This was cut to a 5.5" to allow a white border.


I then Stamped my image in Gina K black ink and coloured my image in alcohol markers.
I fussy cut this out, but the dies are available.


I then added my Nuvo drops
Stamped out my sentiment on black card stock and embossed in white.
Then I added it to my card to finish the look.


I loved creating this card and have also purchased the shaker card pouches which i'm sure I will be using soon.

Happy Crafting 
Jo
xxx

Wednesday 17 July 2019

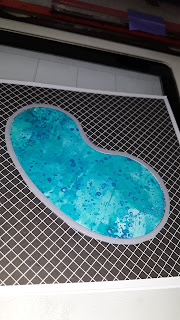
Stretching your die to create a totally different card idea.Using the Latest Swimming pool die from MFT.

Well Hello and Welcome to my blog this morning,
I have so many dies, after 16 yrs of collecting. (Don't Judge Me)

 Occasionally I see a total different use for them. I think this is what they call thinking out the box.

The latest release from My Favourite Thing Swimming Pool Die-Namic, is one such die, let me explain.
This Has so many possibility.
A Pond,  A  Bean, Jelly, Broad, Baked, Kidney, A Aubergine,Pond, Puddle and what I choose to use it for an Artist Palette. 


This quick an simple card is eye catching, and means you get more for your money its like a three in one.

Products
MFT Swimming Pool Die

MFT Rainbow Greetings Stamp Set

Concord and Ninth Crafty Dies

MFT Over The Rainbow  6 X 6 Paper Pad

Small Oval Die
Various Card Stock Scraps
Nuvo Drops in Red Berry, Ripened Pumpkin, English Mustard, Apple Green, Caribbean Ocean, Crushed Grape, Carnation Pink.

Method


 Firstly I choose my paper from the paper pack.

Then I chose some Brown Card stock cut out the swimming pool shape using the die.
Then taking a small oval die I cut the handle part of the Palette.
I added Drops of the nuvo drops to look like paint.


Die Cut 
the Paint Brushes.


Finally I cut the paper to 5.5 inches mounted it on to a 6 x 6 inch card blank. Then added my palette with sticky foam.
Stamp my sentiment  on to black card and embossed in wow white ultra fine embossing powder.


Next weeks blog will be using it as intended, with more from the latest My Favourite Things release.
Happy Stamping 
Jo
xxx

Wednesday 10 July 2019

Friends With Fins By MFT (Birdie Brown) using different ink pads and sprays to create watery back grounds.

Well Hello, 
When ever I think about watery scenes, I tend to lean towards my water colour mediums,
I find Real Brush Markers from Zig's,Watercolour Paints, Oxide Pads and Sprays,help me achieve that movement in the water look.   
But this  time I went a step forward by teaming it up with a embossing folder, I tend to forget things I have and my desk has been crammed with stencils, as they have been so on trend. But recently I have been decluttering the craft room. There was some gems in there I had forgotten. The Cuttlebug embossing file Divine is such item.


I am pleased with the results as, I feel it has added a lot of demention, also more movement to my piece.

Products
Friends with Fins (Birdie Brown) by MFT
https://www.bumbleberrys.co.uk/collections/my-favorite-things/products/bb-friends-with-fins

Under The Sea Dies
https://www.bumbleberrys.co.uk/collections/my-favorite-things/products/die-namics-under-the-sea?variant=22635083759698

Cutter bug Embossing Folder (any would do)

Zig Real Color Brush Markers
Water Colour Card Stock
Pink and Green Card Scraps
Black Card Stock
White Embossing powder
Glossy Accents or Nuvo Clear Glaze
White Gelly Roll

Method

Firstly I wet my water colour paper then starting laying on colour, by just scribbling with the zig pens. Then with a paint brush and more water, blended it around.
Once it was almost dry, I ran the piece of card stock through the die cutter machine with the embossing folder.Any folder will do, I choose this as it had swirls.


Off to the side I coloured my dolphins,
 with the same pens and used a water brush to blend the colour.
I attached them with sticky squares.
Die cut my seaweed using the under the sea dies.
Stamped my sentiment on to black card stock and embossed in wow white fine powder.
Added a few bubbles with glossy accents. I created highlights on my dolphins with a white jelly roll pen.
That was that card completed.

Here is another card I made using similar techniques.


This one is using my Gansi Tambi Water Paints.
Masking the area first, then adding splashes of Champagne Gold from the (Starry Nights)
Then again I painted the Whale with Zigs.

Last but not leased I made a background using the oxide sprays in Mermaid Lagoon and Twisted Citroen. Then flicked on gold water colour to add a little something.


I do hope your give it a try. Making watery back grounds is fun. You can try with all your water  mediums and see what works for you.

Happy Stamping
Jo
xxx


Wednesday 3 July 2019

Using The Original Distress Inks to Faux Water Colour, Featuring the Beautiful Stamps Tropical Flowers by MFT

Hi there, welcome to this weeks, Wednesday Blog post.
I decided to get more from my original Distress inks, as I tend to forget about them now we have the oxides.
But as much as I love the Oxides, I find the give a chalky finish.
This time I wanted something more vibrant. Plus a speedy way to get a water colour finish. So call it a cheat way, I call it a technique.


Products
Tropical Flowers By My Favourite Things

Distress Ink Pads (original)
Picked Raspberry
Twisted Citron
Mowed Lawn
Worn Lipstick
Wilted Violet
Water Colour Card Stock
Water Spritzer
Black Card Stock 
White Embossing Powder 
Clear Gems

Method

Firstly I set up my design on my misti, but you could do this with acrylic blocks.


Lightly tapping the distress inks I ink up my flowers using Picked Raspberry, Worn Lipstick and Wilted Violet. (add your lightest colour first. this stops contamination of your inks.)


 Before closing the lid of the misti, I lightly spray a mist of water over the inked image.
(Do the same with an acrylic block).


I then wait a few minutes for this to dry, then do the same with the leaves and then finally add the second layer to the leaves and centre of the flowers.
 So quick, and such a unique look of water colouring.


I then matted this on black card stock, and embossed my sentiment in white.


I love this idea as I struggle a bit with water colouring in the tradition way.
Here's a bonus card, using the  with the same set.
This card is using the stamps as intended,  layering them up. I used Altenew inks. 


Thank you for stopping bye for this quick and a simple design, go on give it a try. These stamps are much easier to line up than others ive tried.

Happy Stamping
Jo
xxx


Followers