Wednesday 27 March 2019

Just Ducky I'm Prepared for Easter, Using Pastel Hues, for A Spring Like Feel, To my cards.

Morning Crafty Friends,
Well its officially Spring.
Birds are nesting and flowers are popping,
 out the ground after there winter sleep. 
Fresh buds on the tree's, the world is bursting in to colour.

So with Easter around the corner, its time to start a few designs for family and friends Easter cards.

Picking my favourites from the latest releases.
My Favourite Things, catch my eye with their Just Ducky Stamps.


Products


Distress Inks in, Twisted Citron, Mowed Lawn and Tumbled Glass.

Alcohol Markers

Tiny Hearts from Doddlebug


Method


Stamp out images using Gina K ink or alcohol pen ink friendly.(Memento)


Colour the images using your chosen medium. In this case Alcohol Pens.


Die Cut the images out.


Next start on preparing your back ground.
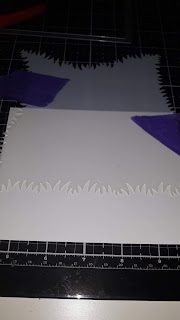
Using your stencils, to create sky and grass.


Once finished, die cut out your frames using the A2 rectangles.


Then put it back together, using foam mounting tape to give height.


Add characters and sentiment.
Finish with a few embellishments (Tiny Hearts)

Thank you for popping on over,
Until next week
Happy Stamping 
Jo
xxx 


Wednesday 20 March 2019

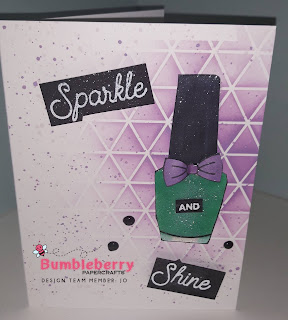
Sparkle and Shine with Honey Bee Shine on Stamps and Geometric Background Stencil.

Good Morning and Happy Wednesday to you,
Today I'm featuring some pretty stamps from Honey Bee.
I wanted this set for a while and gave in this month as its perfect for my girl friends.


Products

Honey Bee Stamps Shine On

Honey Bee Stencil Geometric Background 

Distress Oxide in Dusty Concord
Glossy Accents
Alcohol Markers
Aqua Sparkle Pen
Nuvo Drops in Black Gloss
White Embossing Powder
Black card stock
A Paint Brush

Method


Stamp and Colour your images, using alcohol friendly ink pad.
 I use Memento or Gina k Amalgam ink in black.
I then use the aqua sparkle pen to make the nail varnish sparkle.


Cut out your images with dies or fussy cut.
Now we start with the back ground.


Hold down your stencil over a card front panel.
Gentle rub on using blending brush.
I recommend cheap oval foundation brushes from ,Amazon,
 they are a fraction of the price of designer ones. 

I have been ranting about them for weeks, and introduced my Teamie Verity to them.
She did an amazing blending flower card using them with Atenew Stamps.

After removing the mask, I took a paint brush and some distress oxide.
 I flicked this on to my project.
This adds more detail and interest.


While this dried.

 I stamp and embossed my sentiment.


I messed about with the placement.
Then added Nuvo Drops to finish.


Then my card was complete.
Thank you for popping over and Happy Stamping.

Jo
xxx


Wednesday 13 March 2019

Creating Cards using backing papers featuring Lawn Fawns Spiffy Speckles Paper Pack and Avery Elle Easter Chicks Stamps.

Hi There Crafty Friends,
Some times we just don't have the time to, fuss about creating a background or we are producing more than one card at a time.
Christmas, Easter etc......
So I thought I show you how to use your paper packs to work as a back ground and speed up you card making.


PRODUCTS

Avery Elle Easter Chicks Stamps
 https://www.bumbleberrys.co.uk/products/easter-chicks-clear-stamps?variant=21342599413842

Lawn Fawn Spiffy Speckles Paper Pad
 https://www.bumbleberrys.co.uk/search?q=lawn+fawn+paper+pack

Doddlebug Mini Shape Sprinkles
Nuvo Drops Gloss in Babe Blue, Dandelion Yellow, Sweet Lilac.
Glossy Accents by Ranger
Garden Flowers Jasmine (Little Things From Lucy Cards)

Firstly I made the background out of the backing paper.


Then I stamped out the butterfly's on to the lilac paper.


I then stamped and coloured the chicks.
Put them all together on a card blank.
I then embellished, using Nuvo drops, Doodlebug heart stickers and little Jasmines
I then stamped the sentiment, on to more of the lilac paper pack and attached it to the bottom right. of the card


Lastly I added Glossy accents to the butterfly's wings and chicks beaks.
A very Spring, Easter feel, with the paste colours.

I enjoyed moving into Spring Colours as we all need a bit of colour this time of year.

Thanks For Popping On Over

Happy Stamping

Jo
xxx


Wednesday 6 March 2019

Be Hap-pea adorable stamps from Lawn Fawn, in three easy Peasy ways to make a card.

Hi There Crafty Friends,
Well its Wednesday, so its my turn up on the blog today. I've been on a week off from my day job.
 This meant I had plenty of time to play with the Hap-pea stamps from Lawn fawn. 
They remind me of the kids show a few years back, called the Poddingtion Peas.
I had ask the boss (Katrina), to let me know when these cute stamps were coming in.


Once I started playing I became a bit hooked on these little pea's.

PRODUCTS

Be Hap-pea Stamps by Lawn Fawn

 https://www.bumbleberrys.co.uk/products/be-hap-pea?variant=21414912229458

Be Hap-pea dies

https://www.bumbleberrys.co.uk/products/be-hap-pea-lawn-cuts?variant=21414912262226

On The Jar Card I used How You Bean? stamps

https://www.bumbleberrys.co.uk/search?q=how+you+bean

Alcohol Pens
Masking Paper
Various Inks for the Background
Vellum
White Embossing Powder


Card One


Randomly stamped and coloured a very quick and easy card.

Card Two


Mask off One third of the card. Then blend a few colours of inks to create your background.
Stamp and colour your images. Stamp your sentiments. Add your images in a design,this creates the next quick card.


Card Three

This last card involves masking, and stamping. I also used the, How You Bean Jar  Stamps by Lawn Fawn.


Stamp the Jar image.


Stamp again on Masking paper


Cut out the middle


Place it over your stamped image.
 

Then make a mask for your peas.
 I used a stack of five post it notes and cut them all at the same time.


Cut out the pea mask.


Stamp your pea's and us the mask to fill in the areas.


Pick out the faces for your pea's.


Stamp on their faces.


Then colour your pea's.
I used Alcohol Markers.


On vellum stamp and emboss the sentiment, Your Sweet.


I then added a pea image that i had left over from Card Two.


So as you can see I have really enjoyed playing with this set.

I hope you enjoyed popping on over.
Happy Stamping
Jo
xxx


Followers