Tuesday, 31 October 2017

Wednesday Blog for Bumbleberry using Heffy Doodle stamps, Ad-Roar-Able Lions 3 Different Cards.

Hi There Crafty friends,
I haven't stopped playing with these stamps https://www.bumbleberrys.co.uk/collections/stamps/products/ad-roar-able-lions, their whimsical designs are so versatile that ideas, were popping in to my head. So instead of a step by step this week. I thought i just show you all the cards I've made this week using these fantastic stamps.

Card One
Masking Tecniques

Card Two
Random Stamped Backgrounds


Card Three
Interactive + Background

God Bless
Jo
xxx

Tuesday, 24 October 2017

Wednesday Blog for Bumbleberrys using The New Release From Heffy Doodle Stamps, Ad-roar-able Lions.

Hello There Crafty friends,
I hope your enjoying half term at the moment, and you've managed to get some crafty time to your self. I have the week off my other job, so I'm making the most of not having to go into work, and extra time in my craft room. 
This week I have had the exciting task of playing with a new stamp company, to Bumbleberrys. Heffy Doddle which was only formed in 2017 in the USA, by Lesley Oman.
 Her Whimsical designs are so cute and quirky, I have adored playing with the Ad-roar-able Lions. https://www.bumbleberrys.co.uk/search?q=ad-roar-able+lions I teamed it up with the MFT radiating ray stencil https://www.bumbleberrys.co.uk/products/stencil-radiating-rays


Firstly I stamped the Lions on Neehah Card stock, with Memento Ink, and then coloured them in alcohol inks. Then I die cut out the largest lion. 
To create the background I used the MFT stencil and using oxide inks in three shades, I blending them from lightest to darkest from the inside to the outer edge f the stencil.


Then I stamped the sentiment in black,mounted it on to black card stock then put it onto a card blank.


Mounted the Lion with some foam tape to raise him, to create dimension.Then added a few more sentiments to build up the design.


I do hope you check out some of the new stamps, at Bumbleberrys from Heffy Doodle, as the are so unique and fun.
I will be back next week with a blog, using these delightful stamps. 
God Bless
Jo
xxx

Tuesday, 17 October 2017

Wednesday Blog using MFT Stamps from the new release and Prisma pencils on Kraft card.

Hi there, Crafty Friends,
This weeks blog takes a look at the latest release from MFT, Dashing Deer.


Cute little Deer images, Bunny and Birdies, Foliage and Sentiments.
 I used my Prisma coloured pencils on kraft card.They show up perfectly,without need for you to put down a white base. 
You can also use spectrum noir pencils (colour blend). But price and quality in my opinion, Prisma are beyond fantastic on both counts and used by any famous crafting gurus. 


Firstly I coloured the images with Prisma pencils then die cut the frame.
Then stamp the sentiment under the image. Using a white pencil I blended around it, to create the look of snow.
Then on a separate piece of kraft I stamp another sentiment. 
Finally I add Nuvo drops in white to create the look of falling snow.
Then mounted it on to a white card blank.
Next week I will be using some new stamps to the range we sell at Bumbleberrys.
Heffy Doodle.

God bless
Jo
xxx
  

Tuesday, 10 October 2017

Wednesday blog for bumbleberrys using MFT Wild Woodland and The Retiform Stamping Technique.

Hi There Crafty Friends,
Well after some major tec problems, I finally managed to download the images used in this blog. I promised to show case this technique, and I was going to make sure I did. I saw the Retiform technique a few years back and have love it ever since, what is it, I hear you ask, well I am going to show you step by step. Using MFT stamps Wild Woodland.https://www.bumbleberrys.co.uk/products/wild-woodland


Step one
Take a card blank and a folded piece of copy paper or card.


Step two
Using an blending tool ink sections on to the card blank.Using the piece of copy paper.


Step Three
 Then using a lighter colour blend in blank white areas.


Step Four

Then masking over each section, post it notes are fantastic and cheap.Stamp each set of stamps you want in your design.

Step Five


Step Six

Move on to each area making sure you covered that section up to the blended line.


Step Seven
Fill each area until it is completed. I think your agree it gives a total different look.Mine is chalky looking as I used Distress Oxides but any ink pad will do.


I hope you enjoyed seeing this technique explained, if there is anything you like me to show please leave a comment i'm only to happy to oblige
Next week I'll be using Prisma pencils and Kraft card. 
God Bless 
Jo
xxx

Tuesday, 3 October 2017

Another Look At Lawn Fawn's Christmas Dreams Stamps, are they just for Christmas.............

Morning Crafty Friends,
I am always looking for ways to get more out of my stash, and this weeks blog has that exact content. Taking another look at Lawn Fawns Christmas Dreams, is it just for Christmas.  https://www.bumbleberrys.co.uk/collections/new-releases/products/christmas-dreams
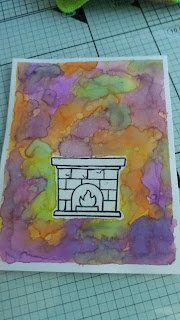
I decided to change the Christmas look of the firer, and to come up with a Halloween Theme Card, getting another take with the same stamp.


I felt the Flames in the firer looked like a ghost.

So I stamped the image of the firer place, on Bristol Smooth card stock. Then using masking fluid to cover it up, then using Distress oxides. I began to make a water colour background. Wetting the card stock first then using a paint brush added in drops of ink.


 Once it was all dry I rubbed away the masking fluid, Then I drew in some cracks, spell books, and spiders webs. Using my Alcohol Markers I then added Colour, also I used the clock and the candle stick from the same set. A bat stamp, a Sentiment stamp from another set I have in my stash.


Using matching card stock I mat and layered the image on to a card blank, then finally added glossy accents and Nuvo drops to finish the look.


After this I looked at the stamp set again and thought the oval rug would make a fantastic stitched petal, so off I went again making a template with a ruler and pencil working out where each petal would go.


I stamp each oval rug opposite to each other. Then Scan and cut out the image.
Did some petal curling with an embossing tool, after it had been coloured using my alcohol markers.


A simple sentiment and we have a totally different card for any occasion. So just because they say a season or occasion, look how you can adapt your stamps, and come up with some thing totally different.
I do hope you enjoyed this blog, please comment as I love to read or your comments.
Also I am only to happy to cover a technique if you would like to see step by steps on a certain look.
Next week I am covering a totally new technique to me, But with out giving to much away, I'm totally hook on this masking technique.

God Bless
Jo
xxx


Followers