Wednesday, 28 April 2021

Another Look At Water Colouring With Distress Ink, Changing Your Sub Straights...….. What Happens?

Good Morning / Afternoon or Maybe Evening.

Welcome

A few weeks ago, I wrote a blog on using your Distress Inks to water colour with, and how easy the result were.

I fell in love with the technique and have many more examples planned. I decided to change my water paper as Bristol (Strathmore) can work out expensive and many of you including me have far more standard water colour paper.

I didn't expect any real difference, but I was very wrong!

Here's both card projects.


The top is on standard water colour paper smooth side and the bottom Bristol Smooth.

When working on this project this time the colour seemed to dry darker and wasn't as easy to blend.

The Bristol on the other hand was very smooth giving a translucent affect. (Now under why its called smooth) I maybe stating the obvious to some of you out there. But for myself and the others, I'm learning your sub straights, i.e.( Card stock or Paper) can impact your mediums performance.

Now on to todays card with that knowledge.


Products

Proud Of You Stamps (Colorado Craft Company)

https://www.bumbleberrys.co.uk/collections/new-releases/products/anita-jeram-proud-of-you?variant=39333482397778

 Obsidian Ink (Altenew)

https://www.bumbleberrys.co.uk/products/obsidian-pigment-ink?_pos=1&_sid=e43805049&_ss=r 

Aqua Sky and Spout Ink Pads (Concord & 9th)

Water Colouring Card stock ( Ranger)

Masking Paper ( Inkadinkadoo)

https://www.bumbleberrys.co.uk/collections/inkadinkadoo/products/stamping-mask-paper 

Paint Brushes (Altenew)

https://www.bumbleberrys.co.uk/collections/adhesives/products/artists-watercolor-brushes-bundle

Distress Inks Pads or Reinkers ( Ranger) in Brushed Corduroy, Frayed Burlap, Ground Expresso, Hickory Smoke, and Fired Brick.

Fine liners and Jelly Roll White pen (For Detail)

C6 Card Blank

Method

Stamp your chosen image on to your water colouring cardstock in a water resistant ink. I used Obsidian ink in black. 

Stamp you inkpads, to form a pallet. 

Paint your image's.

Once they are dry, stamp your masking paper and cut out the image. Then place it over your  DRY WORK.

Then using the dye inks of your choice, blend on the sky and grass. I used Concord & 9th inks as below.


Once this was dry I removed my masking paper. Before mounting my work on to a  card blank, I added details to their fur and high lights using fine liners and white jelly roll pen.


Happy Stamping

Jo
xxx


Wednesday, 21 April 2021

Creating Three Cute Little Children's Cards With Petite Pal's (Concord & 9th) Using A Colour Combi Of Red, White and Blue.

 Well Hello,

 Today's blogpost is all about creating some cute little note card's for the younger members of the family.

 Using a mixture of brands.


Products

Petite Pal's Stamp Set (Concord & 9th)

https://www.bumbleberrys.co.uk/collections/concord-9th/products/petite-pals-stamp-set

Petite Pal's Cordinating Dies (Concord & 9th)

https://www.bumbleberrys.co.uk/collections/concord-9th/products/petite-pals-dies 

Candyland Paper Pack ( MFT)

Blue Raspberry Cardstock (Gina K)

Neenah 80lb

Alcohol Pen's

Jelly Roll Pen in White

Various Enamel Dots

Amalgam Ink Pad ( Gina K )

Card Blank's


Method

Stamp out your images in Amalgam ink, on to alcohol friendly card  stock.

              Add in all the stamps, with pattern's and detail's. To create your character. Great if you can match them to the recipient.


Using alcohol markers colour your image. Repeat this for as many card's as you wish to make.


Add in fine detail with a white gelly roll pen.


Choose some pattern paper to coordinate with your look.

 
Next layer up your design keep with the chosen colour combination. Use the dies to add elements.


Carry on with as many images as you are going to make.


Add enamel dots.


These are great for giving to the children, or grandchildren. Sure to bring a smile.

Happy Paper Crafting
Jo
xxx


Wednesday, 14 April 2021

Creating A Slimline Scene Card, With My Favorite Things" Mice Day To Celebrate." (Birdie Brown)

Well Hello, 
How are you doing!
This week is a relaxing and basic slimline card using my pencils to create a cute birthday card. I love the little mice on the "Mice Day To Celebrate" stamps by MFT.


Products
Mice Day To Celebrate ( My Favorite Things ) Birdie Brown

Neenah 80lb Card Stock

Black Onyx Ink Pad ( Versa Fine)
Embossing Ink Pad ( WoW ) But any would do!
Pencils ( Polychromo's ) But any would do!
Slim Line Card Base
White and Black Jelly Roll Pen's (Sakura) But any would do!
Black Liquorice Card Stock ( Lawn Fawn) But any would do!
White Detail Embossing Powder ( WoW ) But any would do!

Method

Firstly I stamp my scene, on Neenah 80lb card stock using the versafine ink pad. The Image are easy to work with and I didn't need to use masking paper.


I then used my pencils, to colour in my image.


Next I mat this on to a piece of black cardstock leaving a small border. This was then placed on to a card blank.


I then stamped  my sentiment in embossing ink, and poured over detail white embossing powder.
I used a paper trimmer to tidy up my sentiment strip. I placed it over the middle border as I felt this was the best place for it.


I then used my jelly roll pen to add highlights, in white, and nose and eyes in black.

 let me know what you think, of these cute little critters in the comments.

Take Care and Happy Stamping 
Jo
xxx


Monday, 12 April 2021

Altenew 7th Anniversary Blog Hop Day 3 + Giveaway (over $1,400 in Total Prizes) Pop on over to Bumbleberry Papercrafts to leave your comment..


 Well Hello Crafty Friends,

 Before this blog is the incredibly talented Michelle Short https://www.cardgrotto.com/  

Whom is one of my inspirations. 

Can you believe how honoured we are at Bumbleberrys to be joining in with the birthday celebrations. 

Also I thought you would like to see some of the "Amazing Prizes"


Altenew Card Blog Link https://wp.me/p6Dps1-dsz


Products

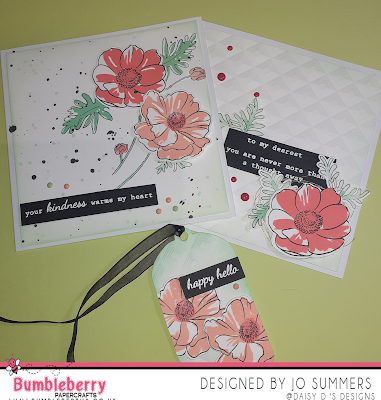
Build -A-Flower Anemone Coronaria Stamps & Dies  (Altenew)

https://www.bumbleberrys.co.uk/products/build-a-flower-anemone-coronaria?_pos=1&_sid=ac79eaa34&_ss=r

3D Embossing Folder Modern Squares (Altenew)

https://www.bumbleberrys.co.uk/collections/altenew/products/mod-squares-3d-embossing-folder?variant=332478249554

Holiday Tag Die Set (Altenew)

https://www.bumbleberrys.co.uk/products/holiday-tag-die-set?_pos=1&_sid=823b62879&_ss=r 

Tea Party Ink Cubes (Altenew)

https://www.bumbleberrys.co.uk/products/tea-party-mini-cube-set?_pos=1&_sid=6aedd94d2&_ss=r 

Green Meadow Ink Cubes (Altenew)

https://www.bumbleberrys.co.uk/products/green-meadows-mini-cube-set?_pos=1&_sid=2ca058223&_ss=r

Tea Party Enamel Dots (Altenew)

https://www.bumbleberrys.co.uk/products/tea-party-enamel-dots?_pos=33&_sid=cb0219ebc&_ss=r&variant=33299478839378 

Metallic Thread Antique Gold (Altenew)

https://www.bumbleberrys.co.uk/products/metallic-thread-set?_pos=8&_sid=c55d0b576&_ss=r&variant=32563014238290 

Ink Spray's Jet Black (Altenew)

https://www.bumbleberrys.co.uk/collections/altenew/products/jet-black-ink-spray?variant=2719421104138 

Obsidian Pigment Ink (Altenew)

https://www.bumbleberrys.co.uk/products/obsidian-pigment-ink?_pos=1&_sid=648a719ba&_ss=r


Also Available from Bumbleberrys

110 lb Cardstock (Neenah )

Black Liquorice Card Stock (Lawn Fawn)


My Stash

Detailed White Embossing Powder

Black Organza  Ribbon 1/4 "

2 x  6" x 6" Card Blanks

Method

Firstly I stamped the line art in Obsidian Pigment Ink.


I turned my cardstock and stamped again.


I then lined up the coordinating stamp to the line image. Using Pink Pearl and Coral Bliss I stamped the shading.

I then used the coordinating dies to die cut the images.


I then chose the leaf images with the stem and stamped them in the same ink.


I then used Minty Mint, and Sweet Leaf ink cubes.


I repeated this to make up a few leaves and stems. I then die cut them and arranged them on to my 51/2 x 5 1/2 " piece of card.


I finished going around the edges with a blending brush with  Minty Mint.

I stamped out all the ink colours from the ink pads to create a water colour palette.
Using the water colours and the ink spay, I splattered the design.
I stamped and embossed my sentiments on to black card stock, in white embossing powder. this was then mounted on to a 6 x 6 " card blank.


Card Two & Tag

I cut a piece of  Neenah cardstock to 51/2" x 51/2" , also a die cut tag. and ran it though my bigshot with the 3d embossing folder.


Both were gently blended with the minty mint ink cube.


I then used the left over flowers and foliage to finish them.


These were all finished with enamel dots and embossing in white embossing powder on black card stock.


I  have loved making these projects, they are so elegant looking. I just love the colours I have chosen. 
Please let me know in the comments what you think.

Next on the Blog Hop is Kymona Tracey https://kreativekymona.com/ 


Happy Stamping and Good Luck , remember to add your comment to the Bumbleberry Blog not on this blog.

Jo
xxx


Wednesday, 7 April 2021

Working With Stencils and Blender Brushes With Two New Company's To Bumbleberry's, Catherine Pooler And Pretty, Pink, Posh. For A Super Quick Birthday Card.

 Well Hello and Welcome,

There has been some exciting addition's to the bumbleberry website over the past few weeks.

I'm over the moon to see, Firstly Catherine Pooler. (which our very own Verity is a uk ambassador for.) The Next is Pretty, Pink, Posh. 

Last week I demoed using Colorado Crafts Company also new here at Bumbleberrys.


Products

Layered Birthday Stencil A (Pretty, Pink, Posh)

Happy Birthday To You Die (Pretty, Pink, Posh)

Inkpads In,
 Tutti Frutti, Tiki Torch, Lime Ricky, All That Jazz, (Catherine Pooler)

Crystal Glaze or Glossy Accents

White Neenah 80lb  6 x 6 " Cardstock 
 
Black Cardstock

White Jelly Roll Pen

Method

Using a blending tool, I prefer a brush as it gives a lighter lay down of colour, work down the card in rainbow order. These ink's are super juicy and I had to be very careful not to over saturate the project.


Once you have added all the colours remove the stencil and leave to dry.


Once dry add gloss accents over each balloon image.


Leave to dry over night.


Taking a white Jelly Roll pen add white high lights.


Cut out your sentiment die, three in scrap white card and a final layer of black. Stick these layers together.  Add glossy accents to the black sentiment once you've attached it to your card. 


I think you will agree this is a quick and easy card, the most time consuming thing, is waiting for the glossy accents to dry.

Happy Stamping
Jo
xxx


Followers