Wednesday, 27 July 2022

Its Time To Give Foiling A Go... Using The Balloon Arch From Honey Bee Stamps. My First Attempt, How Did It Go.

 Hi There,

I'm late to the world of foiling to be honest I wasn't sure weather  to invest in the whole foiling system would it be something I would enjoy. I had loved the toner and Deco Foils but this seem a different ball game. After a real delay, I was lucky enough to get a Gemini from a friend, at a great price. As she was selling off her sister's craft stuff as unfortunately she had gone in to a home. So the foil Press seemed the way to go. so I purchased it and there it sat. months and months later, I had brought a few foiling dies but still it sat. 

Until I fell in love with the Balloon Arch  from Honey Bee Stamps.

So how did I get on. Seriously I'm hooked. Follow my method to see how it went.

Products

Balloon Arch Hot Foil Dies (Honey Bee Stamps)

https://www.bumbleberrys.co.uk/collections/honey-bee-stamps/products/balloon-arch-hot-foil-plate-honey-cuts-dies-hbs 

Balloon Arch Stencils (Honey Bee Stamps)

https://www.bumbleberrys.co.uk/collections/honey-bee-stamps/products/balloon-arch-coordinating-set-of-3-6x6-stencils-hbs 

Balloon Arch Dies (Honey Bee Stamps)

https://www.bumbleberrys.co.uk/collections/honey-bee-stamps/products/balloon-arch-honey-cuts-dies-hbs

Birthday Wishes Sentiment Stamps (Honey Bee Stamps)

https://www.bumbleberrys.co.uk/collections/honey-bee-stamps/products/birthday-wishes-4x6-stamp-set-hbs

Gold Foil (Spellbinders)

 Ink Pad For Embossing (Versamark)

Gold  Embossing Powder (Hero Arts)

Distress Oxide Inkpads in Candied Apple, Carved Pumpkin, Mustard Seed,

Twisted Citron, Salvaged Patina, and Wilted Violet. (Ranger)

Crystal Glaze (Nuvo)

Gold Pearl Mix (Little Things From Lucy's Cards) 

6" x 6" Card Blank

Method


First foil your dies follow manufactures guidelines depending on your machine. 
Then add first colour through the stencil marked 1 & 2


Carry on added each section on the stencils with your Distress Oxide Ink Pads.


Once this is finished give it a minute to dry.


Next take the coordinating die to cut out thee balloons and circle.


Attach to your card blank with liquid glue. 


Next die cut the circle again and stamp out your greeting in embossing ink and emboss in gold.


Place in the centre of your arch with mounting foam.


Add your gems and use Crystal Glaze on the balloons.

I hope you enjoyed seeing how easy this was, and I will defiantly be purchasing more as I love the effect it gave to my card.

Happy Paper Crafting
Jo
xxx


Wednesday, 20 July 2022

Using Your Detailed Blender Brushes In Small Places On Your Stencilling

 Well Hello & Welcome

Today I have been having fun using my detailed Altenew brushes. The stencil I choose was from lawn Fawn. The Bubble back ground stencil has very small circles so I needed a very small blending brush to create the look.

Products

Bubble Back Ground Stencil (Lawn Fawn)

https://www.bumbleberrys.co.uk/collections/lawn-fawn/products/bubble-background-stencils

Hills and Drifts Stencil (MFT)

Ink Pads In Mermaid, Minty Fresh, Moonstone, Fresh Lavender and Ballet slippers (Lawn Fawn)

Detailed Blending Brushes (Altenew)

https://www.bumbleberrys.co.uk/collections/altenew/products/detailed-blending-brushes

Alcohol Friendly Black and Grey Ink Pad (Memento)

Alcohol Markers (Any)

Copic in V01, R00, BV000, BG01, BG23,

Mice C0,C2, C3, C5

Card Stock 80lb (Neenah )

White Jelly Roll Pen (Sakura)

Crystal Glaze (Nuvo)

\Bubble Gems (Little Things From Lucy's Cards)

Method


Line up your stencil


Pick your colour choice.


Blending the colours on, by using your detailed blending brushes.


There are two stencils. 


Add little high light with your gelly pen.


Stamp and colour your images.


Die cut them out, and add high lights.
Stamp out your sentiment in grey ink.


Before adding your mice add a little hill, using the stencil and Minty fresh.
lastly add crystal glaze and bubble gems.

Happy  Papercrafts
Jo
xxx


Wednesday, 13 July 2022

Playing With Large Sentiment Dies To Give A Different Look To Your Design. Using Lawn Fawn Products.

 Welcome Crafty People. 

So if you follow my work your know I'm on a Lawn Fawn journey. I love mx and match and coming up with a fun new design. So last August (21) I create a card using the fantastic Giant Happy Birthday To You Die, I decided to take that card up a notch. What Do you think?

                                                                              Old Design


Products

Giant Happy Birthday To You Die (Lawn Fawn)

https://www.bumbleberrys.co.uk/collections/lawn-fawn/products/giant-happy-birthday-to-you-lf 

Tiny Birthday Friends Stamps  (Lawn Fawn)

https://www.bumbleberrys.co.uk/collections/lawn-fawn/products/tiny-birthday-friends-lf

Tiny Birthday Friends Dies (Lawn Fawn)

https://www.bumbleberrys.co.uk/products/tiny-birthday-friends-lawn-cuts-lf?_pos=2&_sid=e5ea7e23e&_ss=r

Ink Pads (Lawn Fawn)

Peachy Keen, Peach Fuzz, Lemonade, Minty Fresh and Merman

Alcohol Friendly Black Ink Pad (Memento)

Alcohol Markers (Any)

110 lb Cardstock (Lawn Fawn)

https://www.bumbleberrys.co.uk/collections/cardstock/products/110lb-white-cardstock

 Crystal Drops (Nuvo) Gloss

 in Bubble Gum Blush, Duck Egg Blue, & Buttermilk.

6" x 6" Card Blank

Method


Stamp out your images in alcohol friendly ink, and colour with your alcohol markers.


Die cut your little images. Put these to the side.


Cut two of the large sentiment die out of 110lb card stock.


Using your inkpads blend a rainbow gradually down your die cut sentiment. Colours are listed. Do this on only one of your die cut sentiments. leave the other one blank.


Once dry glue on your characters that you coloured.


Taking the other die cut sentiment glue this to the back of your blended sentiment.


Add your sandwiched die cut to a 6 x6 " card blank, to finish come in with your Nuvo crystal drops.


Happy Paper Crafting
Jo
xxx


Wednesday, 6 July 2022

A Look At the Mind Field Of Blending Brushes. Ink Blending Your Coloured Card Stock To Add Dimension To Your Die Cuts

 Hi Crafty Friends,

So the biggest thing to hit the craft industry after the hype of the stencil is the "Blending Brushes."

So with so many out there what do you choose and what sizes.


Handle Brushes From Waffle Flower and Taylored Expressions
 (Good All Rounder)

Large Altenew And Pink & Main 
(Large Backgrounds Or larger Card Blending) 

Medium Altenew Blending Brushes
Great for Stencils and Little Die Cuts.)

Detailed Brushes from Altenew 

(Great for Tiny  Detailed Blending.)

Now you don't need all these sizes, ( I've been lucky enough to be given these as part of design work) 

You need one for each colour family one standard brush (Approx 1 1/2")

I choose colour ones as it easier to recognise. But this does come at a cost. Make sure what ever you choose has white hairs in the brush as that is then super easy to know one colour from another.

If later on you want to add the detailed ones I fully recommend Tiny Size Altenew. 

Now on with todays project.

Products

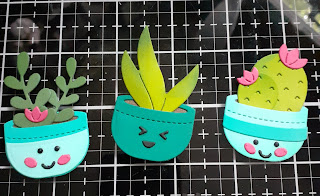
Pant - A - Succulent Die (Lawn Fawn)

https://www.bumbleberrys.co.uk/products/plant-a-succulent-lf?_pos=1&_sid=d71cfebb9&_ss=r

Brick Stencil (Lawn Fawn)

https://www.bumbleberrys.co.uk/collections/lawn-fawn/products/brick-stencil?variant=32608431964242

 Card Stock (Lawn Fawn)

Peacock, Rain Forest, Mermaid, Noble Fir, Cilantro, Guava, Textured Chocolate,

Black Liquorice. 

Ink Pad Colours (Lawn Fawn)

Merman, Artichoke, Noble Fir, Peach Fuzz 

Sentiment Sheets Birthday Babble (Gina K)

Sequins Paris (Catherine Pooler)

6 x 6" Card Blank

Method


Die cut your dies from your coloured card stock.


Blending your ink colours over your die cuts.


Put your dies together with, pot, plant, faces.


Ink blend  Peach Fizz on to your brick stencil straight on to your card blank.
Next mount your die cuts on foam tape and place them in a line. 
Lastly add your sequins.

I hope you've enjoyed today's blog post
Happy Papercrafting
Jo


Followers